Tutorial
On this page
- The big picture in 60 seconds
- Before you start
- The steps at a glance
- Step 1 · Import the notebook
- Step 2 · Get a sandbox
- Step 3 · Copy the kit into the sandbox
- Step 4 · Give the agent your token
- Step 5 · Install the agent
- Step 5b · Start the tool server and set the fence
- Step 6 · Ask your first question
- Step 7 · Ask for something real: build a notebook and prove it works
- Step 8 · Test the fence
- Step 9 · Tidy up
- Part 2 · The same thing from a real shell
- 1 · Look around before installing anything
- 2 · Install the agent and the rules
- 3 · Start the fence
- 4 · See the tools the agent actually has
- 5 · Ask a question
- 6 · Read the log of every step
- 7 · The same shell can use the Databricks CLI directly
- The commands you will use most
- Make it yours
- When something goes wrong
- What this tutorial does not prove
- Where to go next
Time: about 30 minutes the first time. Skills needed: you can run a notebook and paste a token. You do not need a terminal on your own computer. Everything runs from a notebook in your browser, and the agent works in a small temporary Linux machine that Databricks gives you.
By the end you will have:
- a coding agent that answers data questions by running real SQL,
- an agent that builds a notebook, runs it and proves it works,
- an agent that is physically unable to write outside one schema and one folder, which you will test yourself.
About the screenshots. Every picture below is the real output of the real notebook code, captured on a live workspace (run on 6 November 2026) and drawn as an image. They are renderings of text, not photos of the Databricks web page: our automation cannot sign in to the web UI (single sign-on), so the few steps that are clicks in the browser are described in words. Your workspace address and email are replaced by placeholders.
The big picture in 60 seconds
%%{init: {'theme':'base','themeVariables':{'primaryColor':'#E8F0FE','primaryTextColor':'#1F2937','primaryBorderColor':'#A8C0E8','lineColor':'#94A3B8','clusterBkg':'#F8FAFC','clusterBorder':'#CBD5E1'}}}%%
flowchart LR
    You["You<br/>in the browser"]:::blue --> NB["A notebook<br/>you run top to bottom"]:::yellow
    NB -->|"creates and controls"| SBX
    subgraph SBX["Temporary Linux machine (the sandbox)"]
        direction TB
        AG["Coding agent<br/>OpenCode"]:::purple --> TS["Tool server<br/>with the safety fence"]:::pink
    end
    AG -->|"thinks with"| GW["Databricks AI Gateway<br/>gpt-oss-120b"]:::green
    TS -->|"runs SQL, writes notebooks,<br/>only inside the fence"| WS["Your workspace<br/>tables, notebooks, jobs"]:::orange
    classDef blue fill:#E8F0FE,stroke:#A8C0E8,color:#1F2937
    classDef yellow fill:#FFF8E1,stroke:#F2D98D,color:#1F2937
    classDef purple fill:#EFE7FB,stroke:#C9B6EC,color:#1F2937
    classDef pink fill:#FDE7EF,stroke:#F2B5CB,color:#1F2937
    classDef green fill:#E6F4EA,stroke:#A8D5B5,color:#1F2937
    classDef orange fill:#FFEDE0,stroke:#F5C29C,color:#1F2937
Three ideas to hold on to:
- The sandbox is disposable. It is a temporary machine. When you delete it, its disk goes with it.
- The agent never touches your workspace directly. It asks the tool server, and the tool server enforces the rules. This matters because the agent runs without asking permission for each step.
- A supervisor makes the agent finish. The model we use can stop early. A small loop sends it back to work until it shows proof.
Before you start
| You need | How to check | If not |
|---|---|---|
| A Databricks workspace with serverless compute | You can attach a notebook to "Serverless" | Ask your admin |
Access to the AI Gateway sandbox service and the model gpt-oss-120b | Step 2 below creates a sandbox without an error | Ask an admin to grant access to system.ai.sandbox |
| A personal access token | Step 4 explains how to make one | Use a short lifetime (a day is plenty) |
| Somewhere the agent may write | A schema and a folder you do not mind filling with test objects | Step 5b creates nothing for you: pick or create them |
The steps at a glance
%%{init: {'theme':'base','themeVariables':{'primaryColor':'#E8F0FE','primaryTextColor':'#1F2937','primaryBorderColor':'#A8C0E8','lineColor':'#94A3B8'}}}%%
flowchart LR
    S1["1 Import the<br/>notebook"]:::blue --> S2["2 Get a<br/>sandbox"]:::green --> S3["3 Copy the<br/>kit in"]:::yellow --> S4["4 Give it<br/>your token"]:::purple --> S5["5 Install<br/>the agent"]:::pink --> S5b["5b Start the<br/>fence"]:::orange --> S6["6 Ask a<br/>question"]:::teal --> S7["7 Build a<br/>notebook"]:::blue --> S8["8 Test the<br/>fence"]:::pink --> S9["9 Tidy up"]:::green
    classDef blue fill:#E8F0FE,stroke:#A8C0E8,color:#1F2937
    classDef green fill:#E6F4EA,stroke:#A8D5B5,color:#1F2937
    classDef yellow fill:#FFF8E1,stroke:#F2D98D,color:#1F2937
    classDef purple fill:#EFE7FB,stroke:#C9B6EC,color:#1F2937
    classDef pink fill:#FDE7EF,stroke:#F2B5CB,color:#1F2937
    classDef orange fill:#FFEDE0,stroke:#F5C29C,color:#1F2937
    classDef teal fill:#E0F5F3,stroke:#9AD5CE,color:#1F2937
Measured on our run (the two agent steps vary from run to run):
| Step | What happens | Time we measured |
|---|---|---|
| 2 | Sandbox created | 5 s |
| 3 | Kit copied in | 4 s |
| 4 | Token stored | 3 s |
| 5 | Agent installed | 15 s |
| 5b | Tool server started | 3 s |
| 6 | First question | 51 s |
| 7 | Build and run a notebook | 115 s |
| 8 | Fence test | 35 s |
| Whole walk-through | under 5 minutes of waiting |
Step 1 · Import the notebook
The notebook is notebooks/launch_agent_from_notebook.py. It holds every command in this tutorial.
- In your workspace, open Workspace and go to your own folder.
- Choose Import (the menu on the folder, or the Add button). Upload the
.pyfile, or paste its web address (the "raw" link on GitHub) if your import dialog offers a URL box. - Open the imported notebook and attach it to Serverless compute.
The notebook needs only Python's standard library, so serverless is enough. Menu names may differ a little between workspaces.
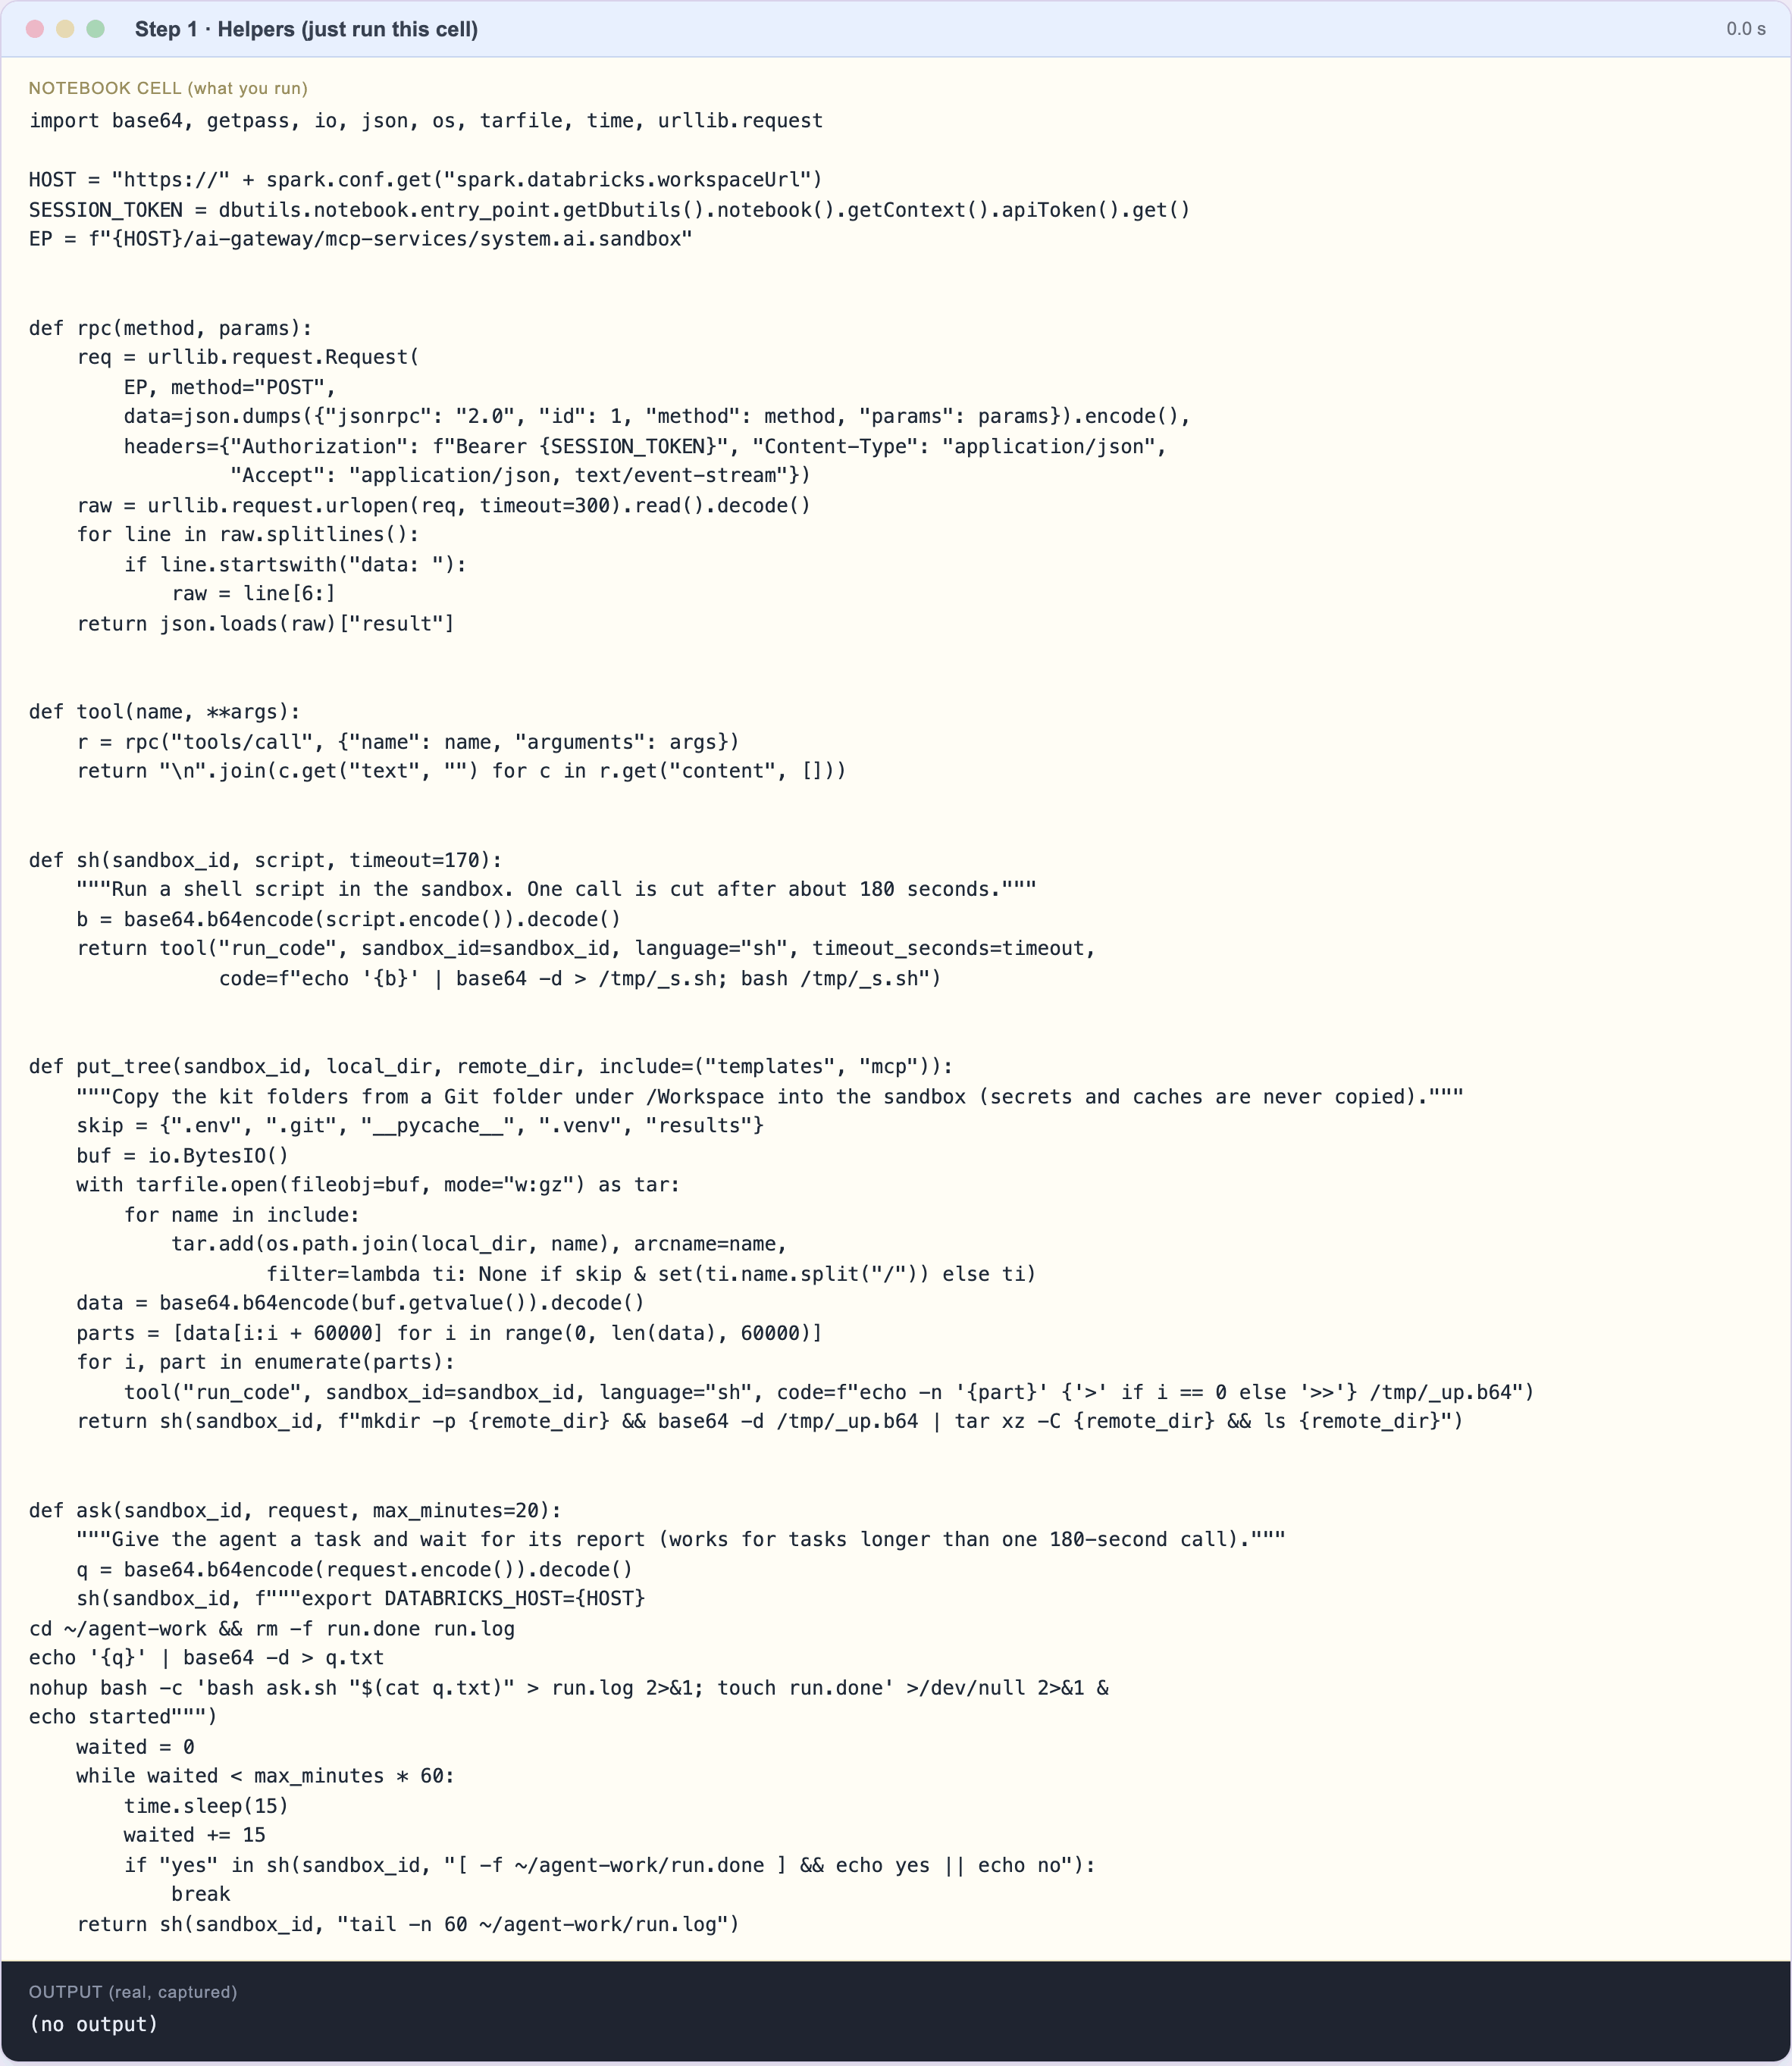
Then run the first cell ("Step 1 · Helpers"). It only defines helper functions and prints nothing. The rest of the tutorial runs the notebook's cells one at a time, top to bottom.
Step 2 · Get a sandbox
Run the "Step 2" cell. It asks Databricks for a temporary Linux machine and checks what is on it.
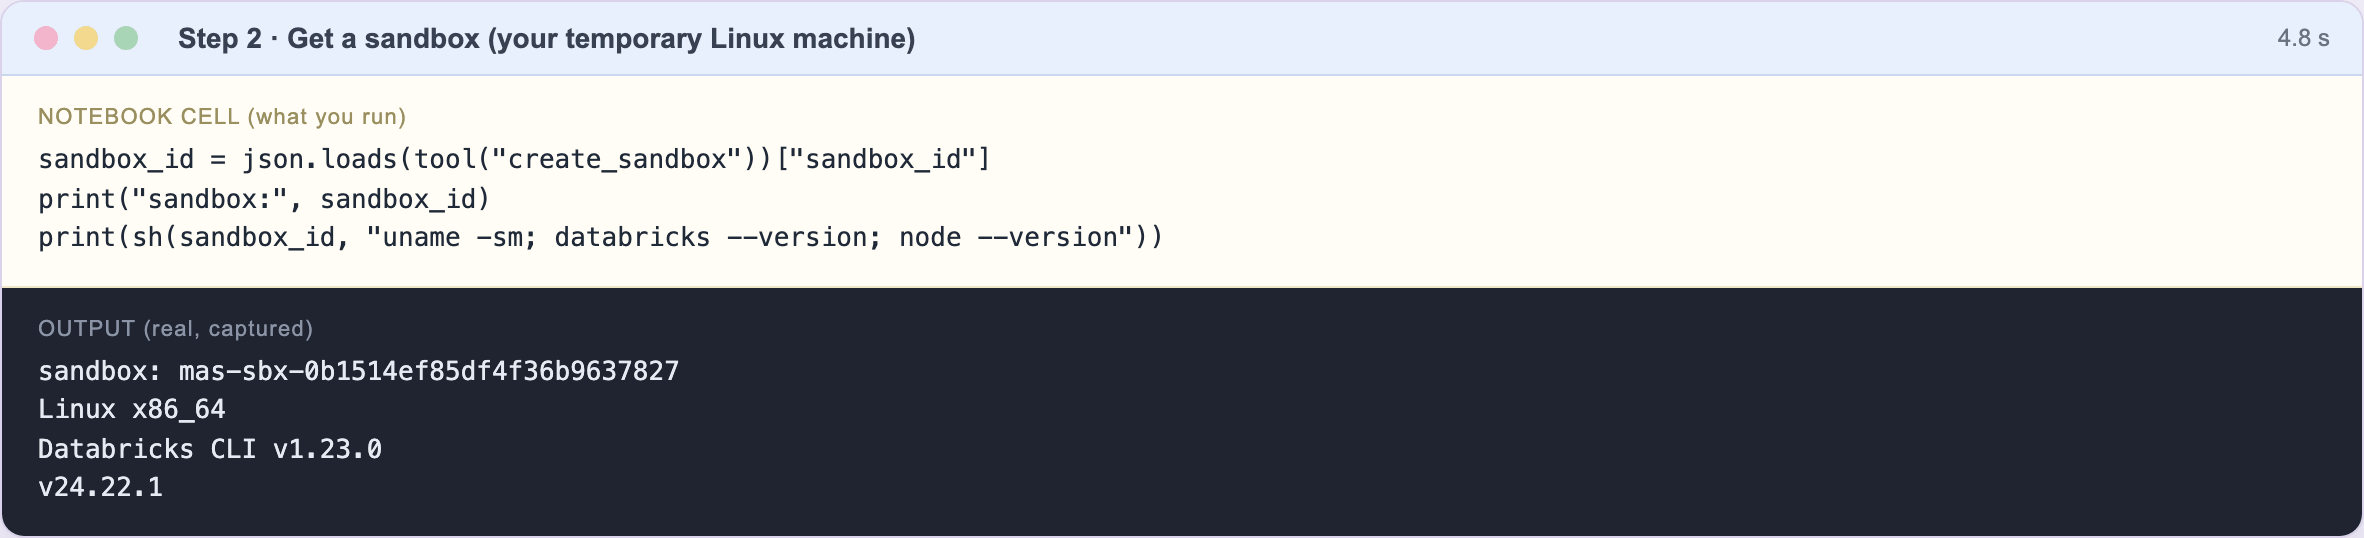
What to look for: a sandbox id and the Databricks CLI version. The machine already has the Databricks command-line tool and Node. It does not have the coding agent yet.
Three facts about this machine:
- One command can run about 180 seconds at most. The notebook's
ask()helper works around that for long tasks. - Its disk is temporary. Keep nothing valuable only there.
- You are not an administrator on it. Everything installs into your own folder.
Step 3 · Copy the kit into the sandbox
The "kit" is the small set of files from this repository that the agent needs: setup scripts, the rules file, the skills and the tool server. There are two ways to copy it. Use one.
| Option A: copy from GitHub | Option B: copy from a folder in your workspace | |
|---|---|---|
| How | git clone inside the sandbox | put_tree(...) reads a Git folder under /Workspace |
| Good when | The repository is public and already contains the kit | Your copy is private or has your own changes |
| What we verified | git clone plus the whole flow below, on 6 Nov 2026 | the screenshots in this page |
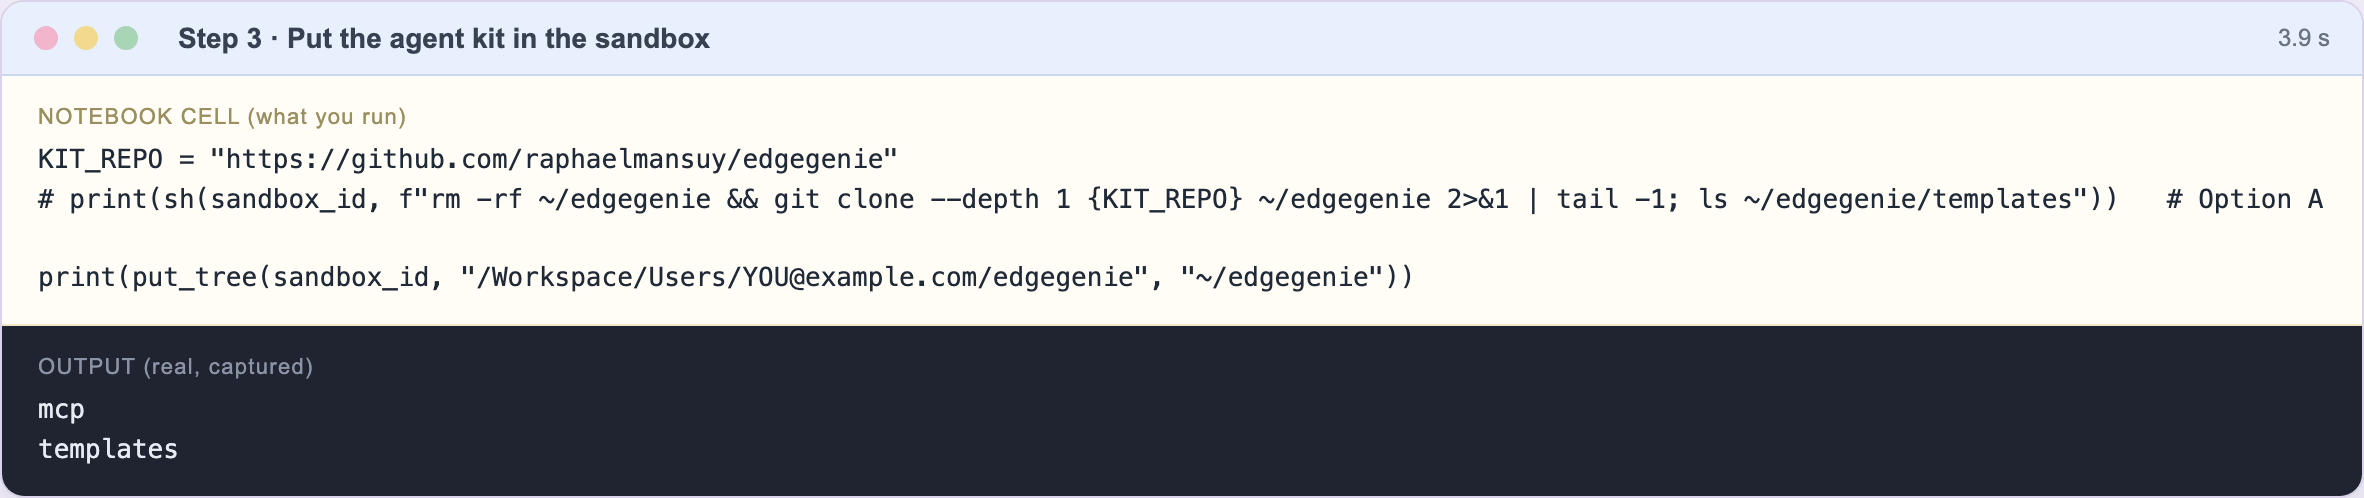
Both options work. The screenshots below show Option B, because the kit was not on GitHub yet when we captured them. We then pushed it and re-ran the whole tutorial from a fresh sandbox with a plain
git cloneof Option A: install, fence, question, answer, all fine. If your copy is private, use Option B.put_treenever copies secrets: it skips.env,.gitand caches, and it only takes thetemplatesandmcpfolders.
Step 4 · Give the agent your token
The agent needs a key to talk to Databricks. Make a personal access token:
- Click your profile picture, then Settings.
- Open Developer, then Access tokens, then Manage.
- Choose Generate new token, give it a short lifetime, and copy it.
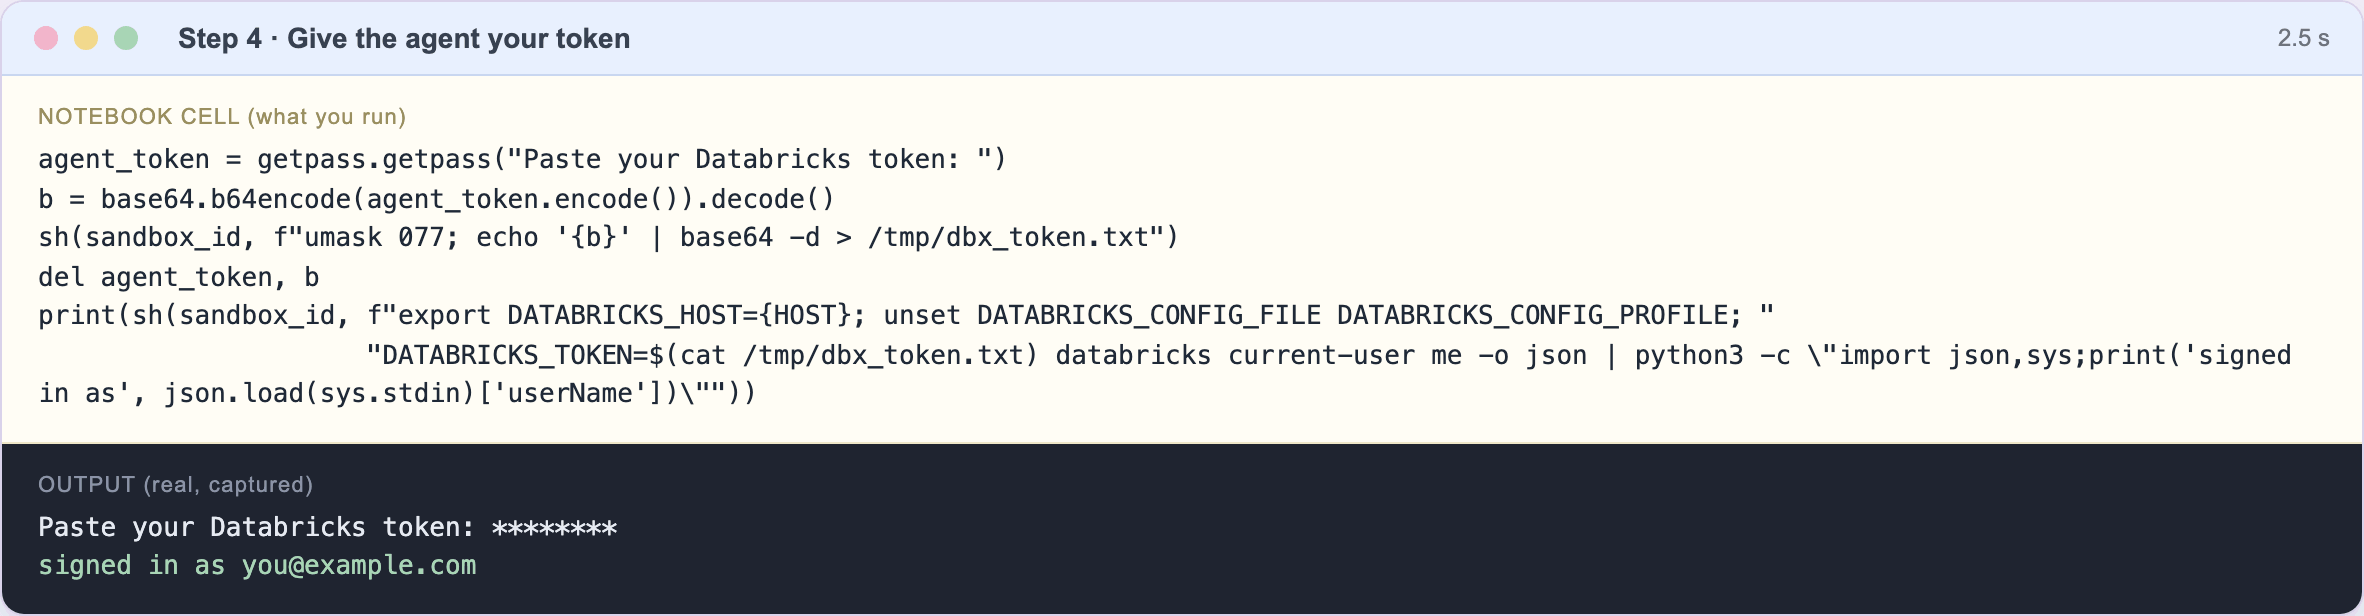
Run the "Step 4" cell. A password-style box appears. Paste the token there.
What happens to the token:
- It is written to one file inside the sandbox, readable only by you, and then removed from the notebook's memory.
- It is never printed. In the screenshot you see only asterisks, then
signed in as ..., which proves the token works. - The agent is told never to display it, and our test harness fails any run whose log contains it.
Not checked by us: the password box inside a real Databricks notebook (we ran the same code with the box answered automatically). If the box does not appear, store the token in a Databricks secret and read it with
dbutils.secrets.get.
Safer than your own token: a token for a service principal that can only reach your scratch schema. We recommend it, but we did not test it. See 04 Safety.
Step 5 · Install the agent
Run the "Step 5" cell. It runs the kit's setup script in the sandbox.
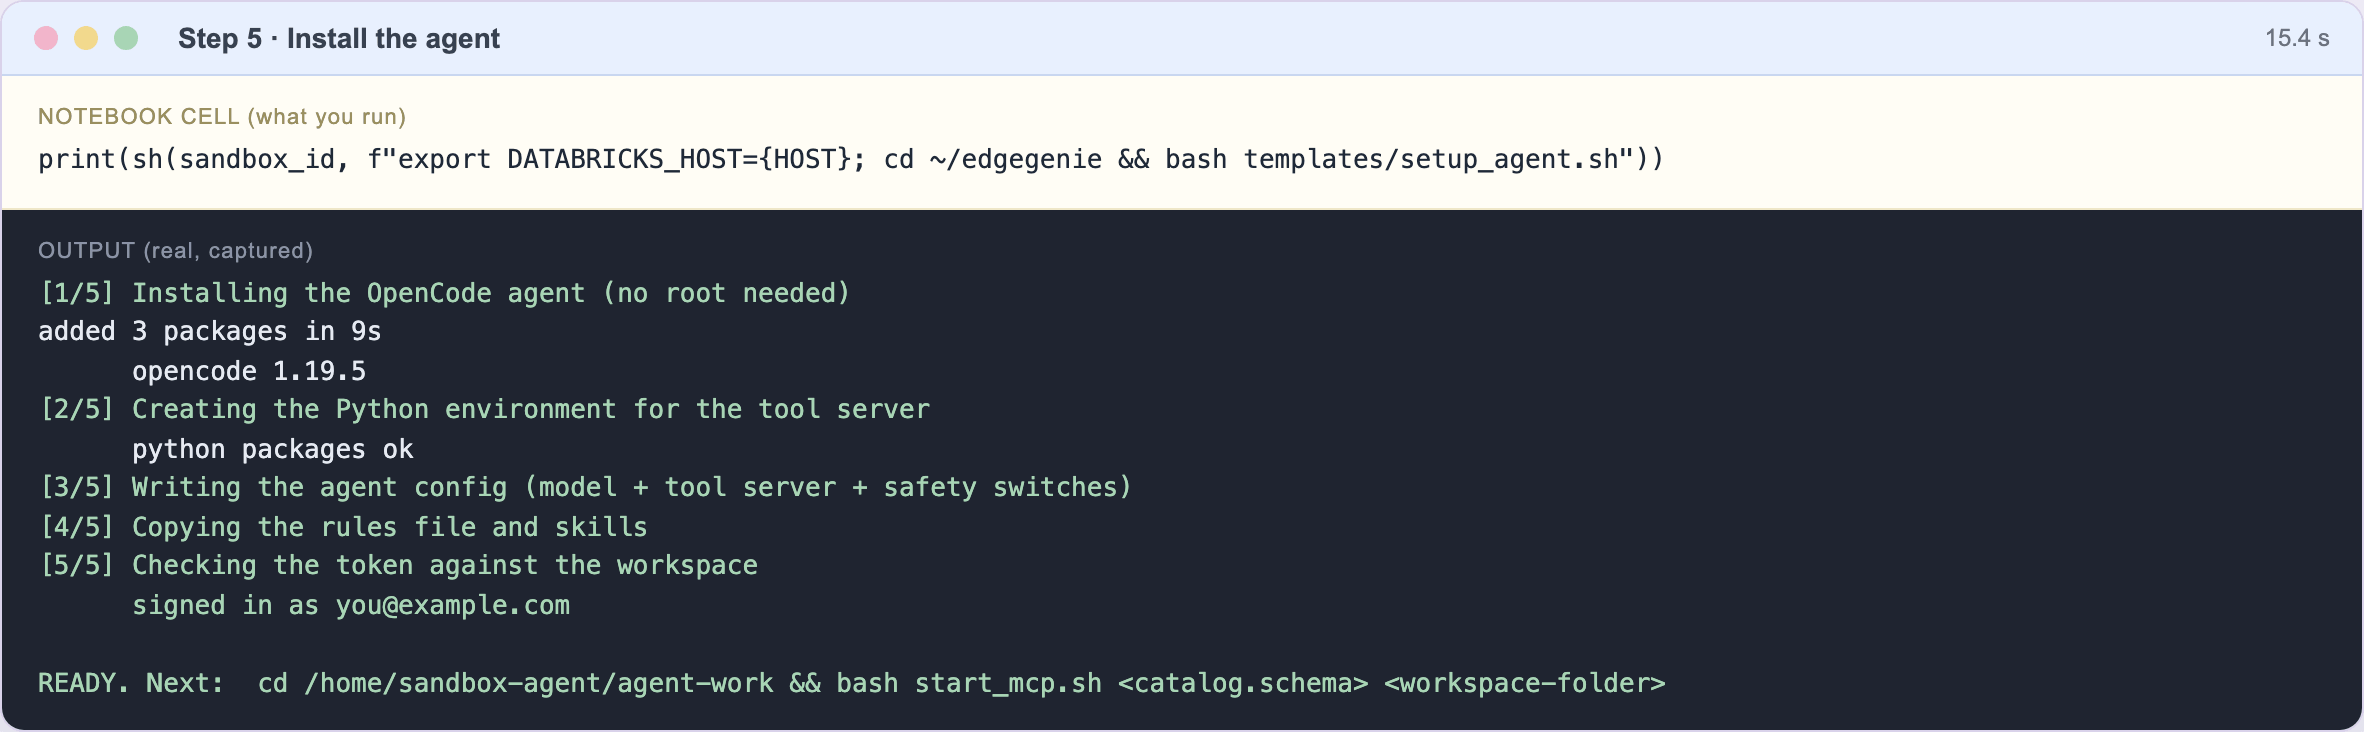
The script does five things, in this order:
| # | What it does | Why it matters |
|---|---|---|
| 1 | Installs OpenCode, the coding agent | Needs no root rights |
| 2 | Makes a Python environment for the tool server | The tool server is a small Python program |
| 3 | Writes the agent's config file | Points it at the model, adds the tool server, hides its built-in file tools |
| 4 | Copies the rules file (AGENTS.md) and skills | The rules are the agent's working agreement |
| 5 | Tests your token | Stops early if the sign-in is wrong |
Two details in the config file are worth knowing about:
"output": 24000limits the answer size. The model allows 25,000, agents ask for more by default, and without this line the call is rejected and you only see a spinner.- The agent's built-in file tools are switched off. They would work on the sandbox's disk, but your notebooks live in the workspace; leaving them on made agents edit files that did not matter.
Step 5b · Start the tool server and set the fence
Edit the two names at the top of the "Step 5b" cell, then run it:
SCRATCH_SCHEMA = "workspace.agent_scratch"                    # the only schema the agent may write to
SCRATCH_FOLDER = "/Workspace/Users/you@example.com/agent_scratch"   # the only folder the agent may write to
Create the schema and the folder first if they do not exist (CREATE SCHEMA workspace.agent_scratch in a SQL cell; a new folder in the Workspace browser).
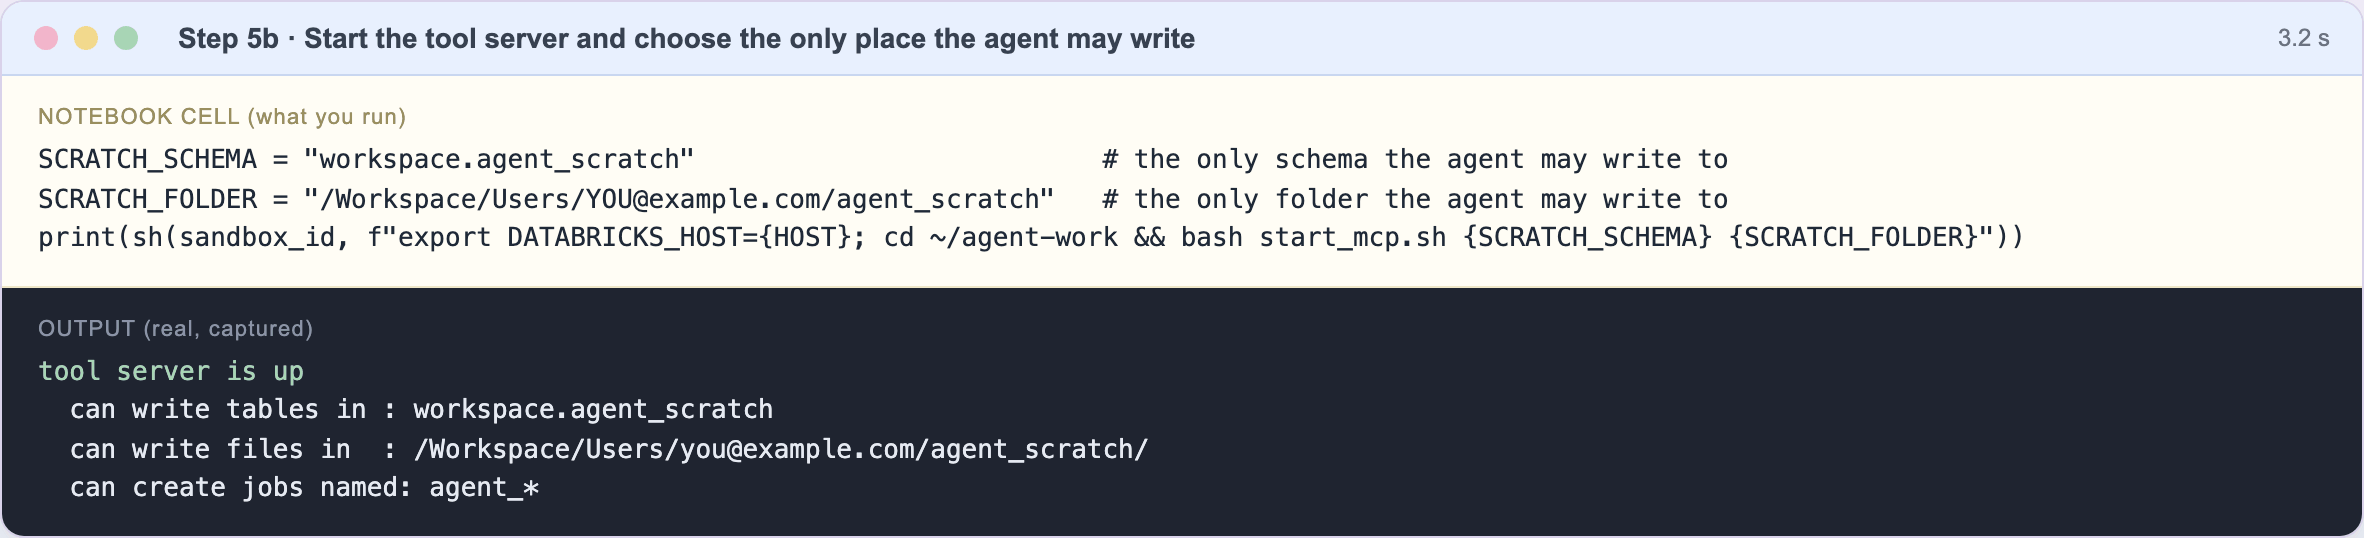
The screenshot's three lines are the fence. They are enforced by the tool server, not by the agent. The agent could be confused or tricked, and the fence would still hold. Step 8 proves it.
%%{init: {'theme':'base','themeVariables':{'primaryColor':'#E8F0FE','primaryTextColor':'#1F2937','primaryBorderColor':'#A8C0E8','lineColor':'#94A3B8'}}}%%
flowchart LR
    A["Agent asks:<br/>write something"]:::purple --> T{"Tool server<br/>checks the target"}:::pink
    T -->|"inside the schema,<br/>folder or job-name prefix"| OK["Allowed:<br/>it happens"]:::green
    T -->|"anywhere else"| NO["Refused with a clear<br/>message the agent can read"]:::orange
    R["Reading anything<br/>you can read"]:::blue --> OK2["Always allowed"]:::green
    classDef purple fill:#EFE7FB,stroke:#C9B6EC,color:#1F2937
    classDef pink fill:#FDE7EF,stroke:#F2B5CB,color:#1F2937
    classDef green fill:#E6F4EA,stroke:#A8D5B5,color:#1F2937
    classDef orange fill:#FFEDE0,stroke:#F5C29C,color:#1F2937
    classDef blue fill:#E8F0FE,stroke:#A8C0E8,color:#1F2937
Step 6 · Ask your first question
Run the "Step 6" cell. The request is a read-only data question:
Which three pickup zip codes in
samples.nyctaxi.tripshave the highest totalfare_amount? Show the SQL you ran and the numbers.
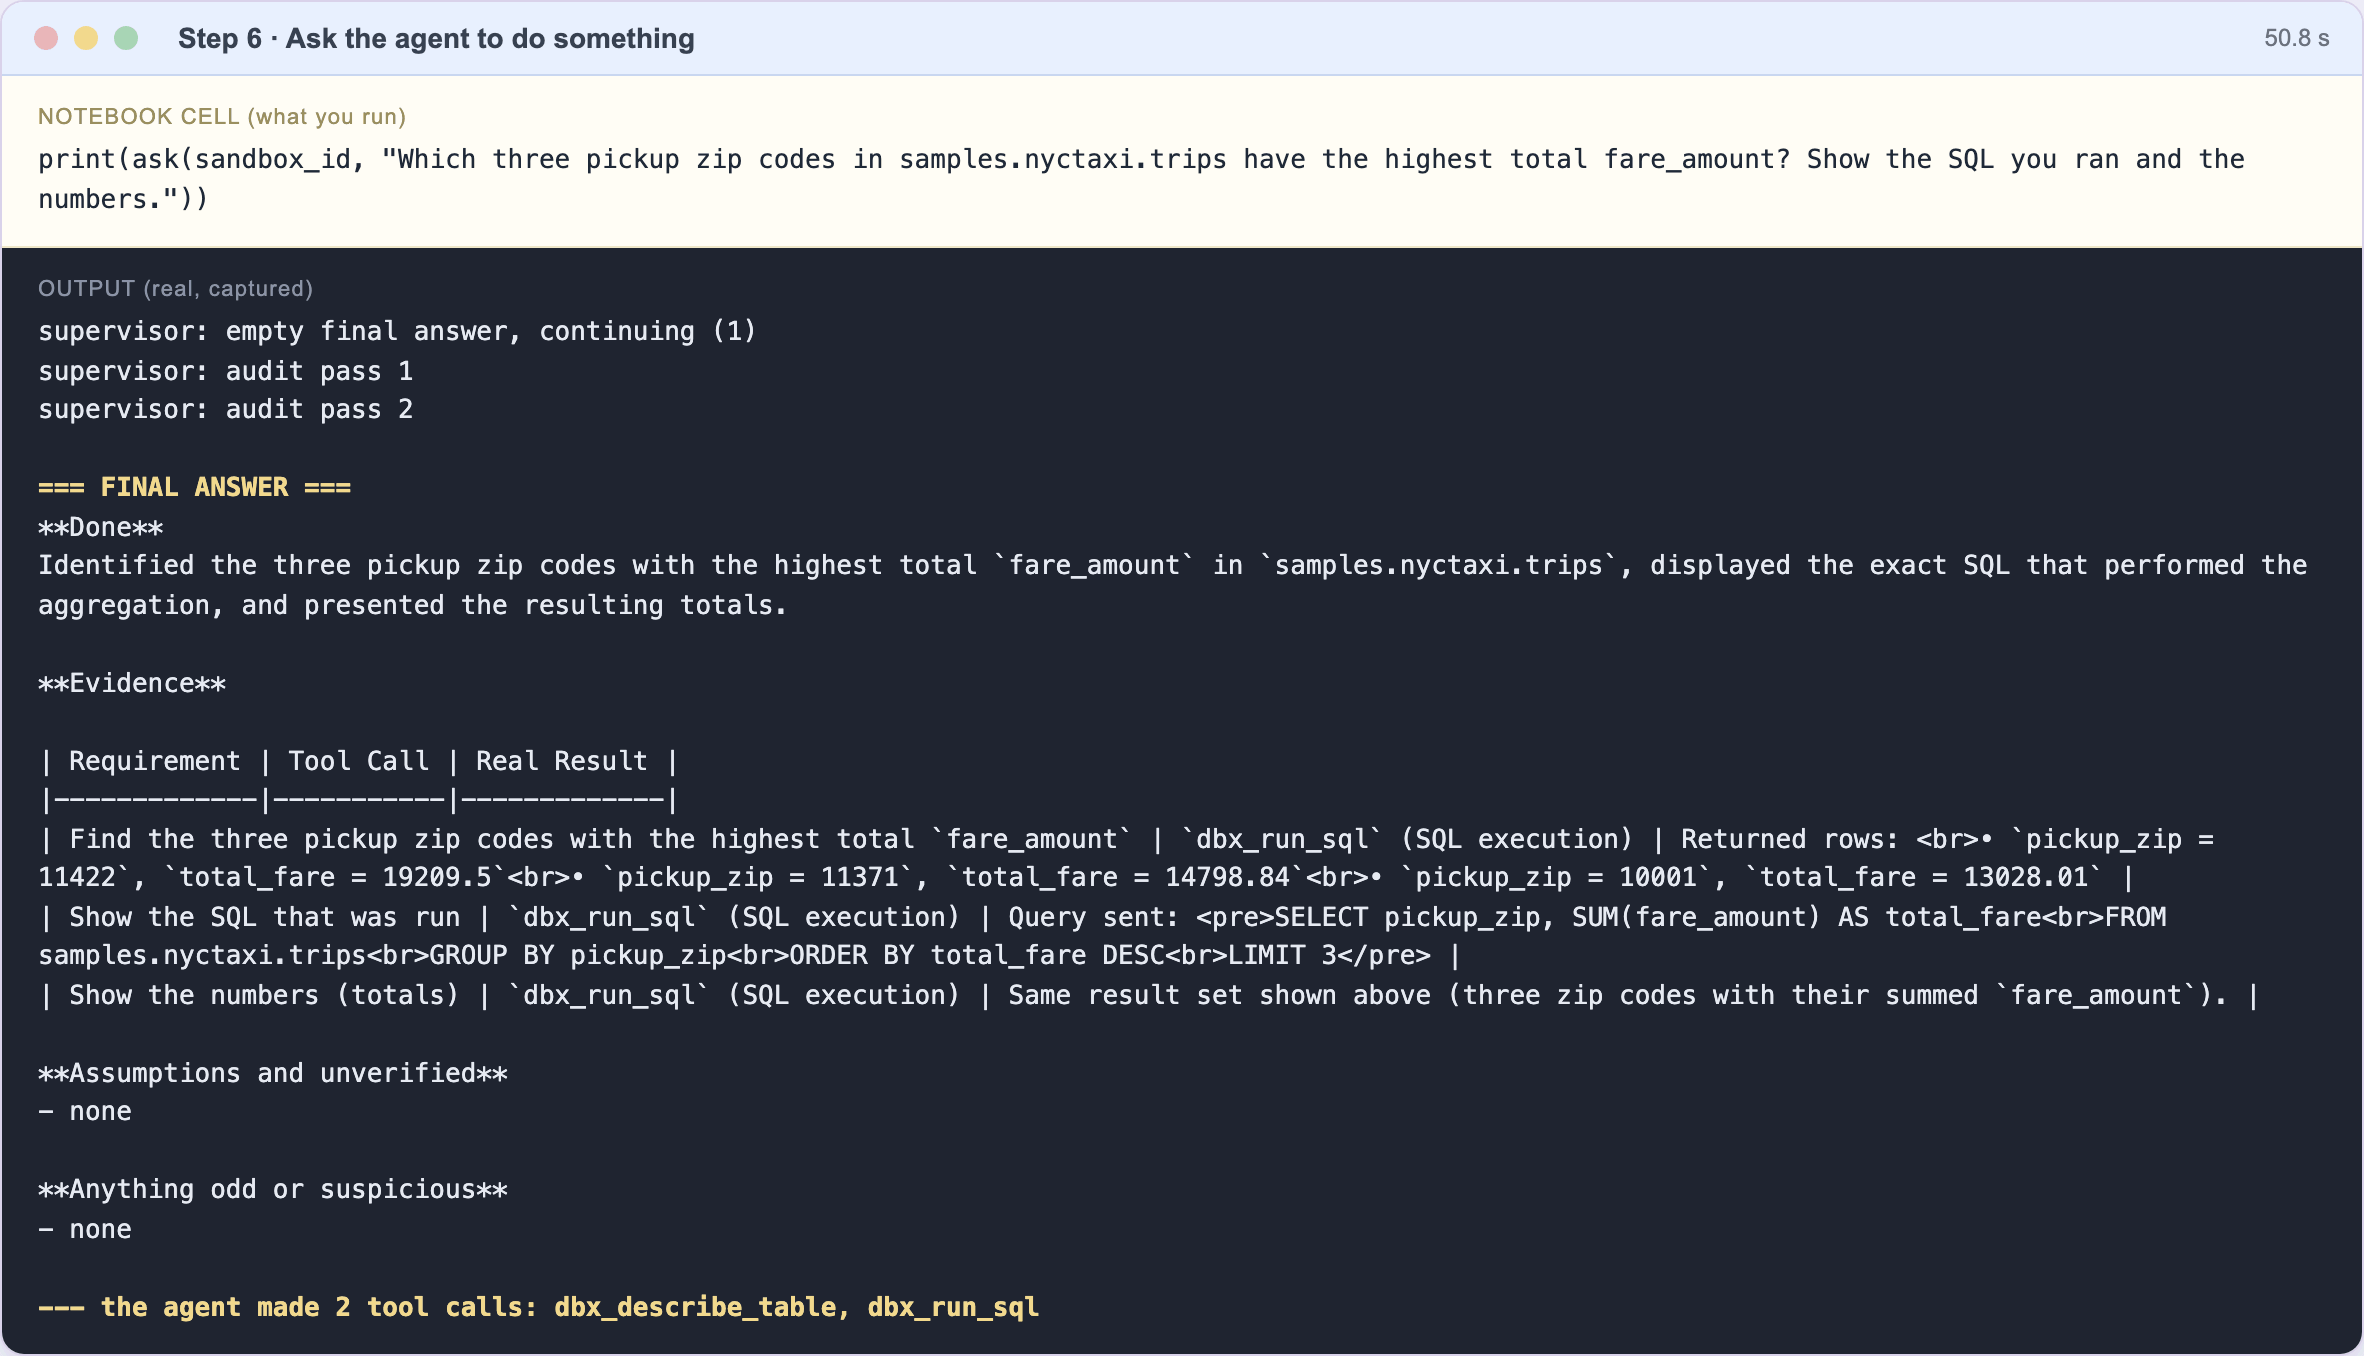
How to read the output, from top to bottom:
| What you see | What it means |
|---|---|
supervisor: empty final answer, continuing (1) | The model stopped without answering, and the supervisor sent it back to work. This is normal for this model: it happened on 3 of our 6 asks over two runs. |
supervisor: audit pass 1 and 2 | The supervisor asks: "name the tool call that proves each requirement". This is what turns a confident claim into checked work. |
=== FINAL ANSWER === | The agent's report, in four fixed headings: Done, Evidence, Assumptions and unverified, Anything odd or suspicious. |
--- the agent made 2 tool calls | It looked at the table's columns, then ran the SQL. |
Do not trust, check. Run the SQL yourself in a SQL cell and compare. On our run it returned
11422 → 19209.5,11371 → 14798.84,10001 → 13028.01, exactly what the agent reported.
Step 7 · Ask for something real: build a notebook and prove it works
Run the "Step 7" cell. The request:
Create a notebook
taxi_hoursin the scratch folder: a title, then cells that count trips and total fare by pickup hour, chart total fare by hour, and end withdbutils.notebook.exit(<number of hours covered>). Run it. Fix any error. Tell me the exit value.
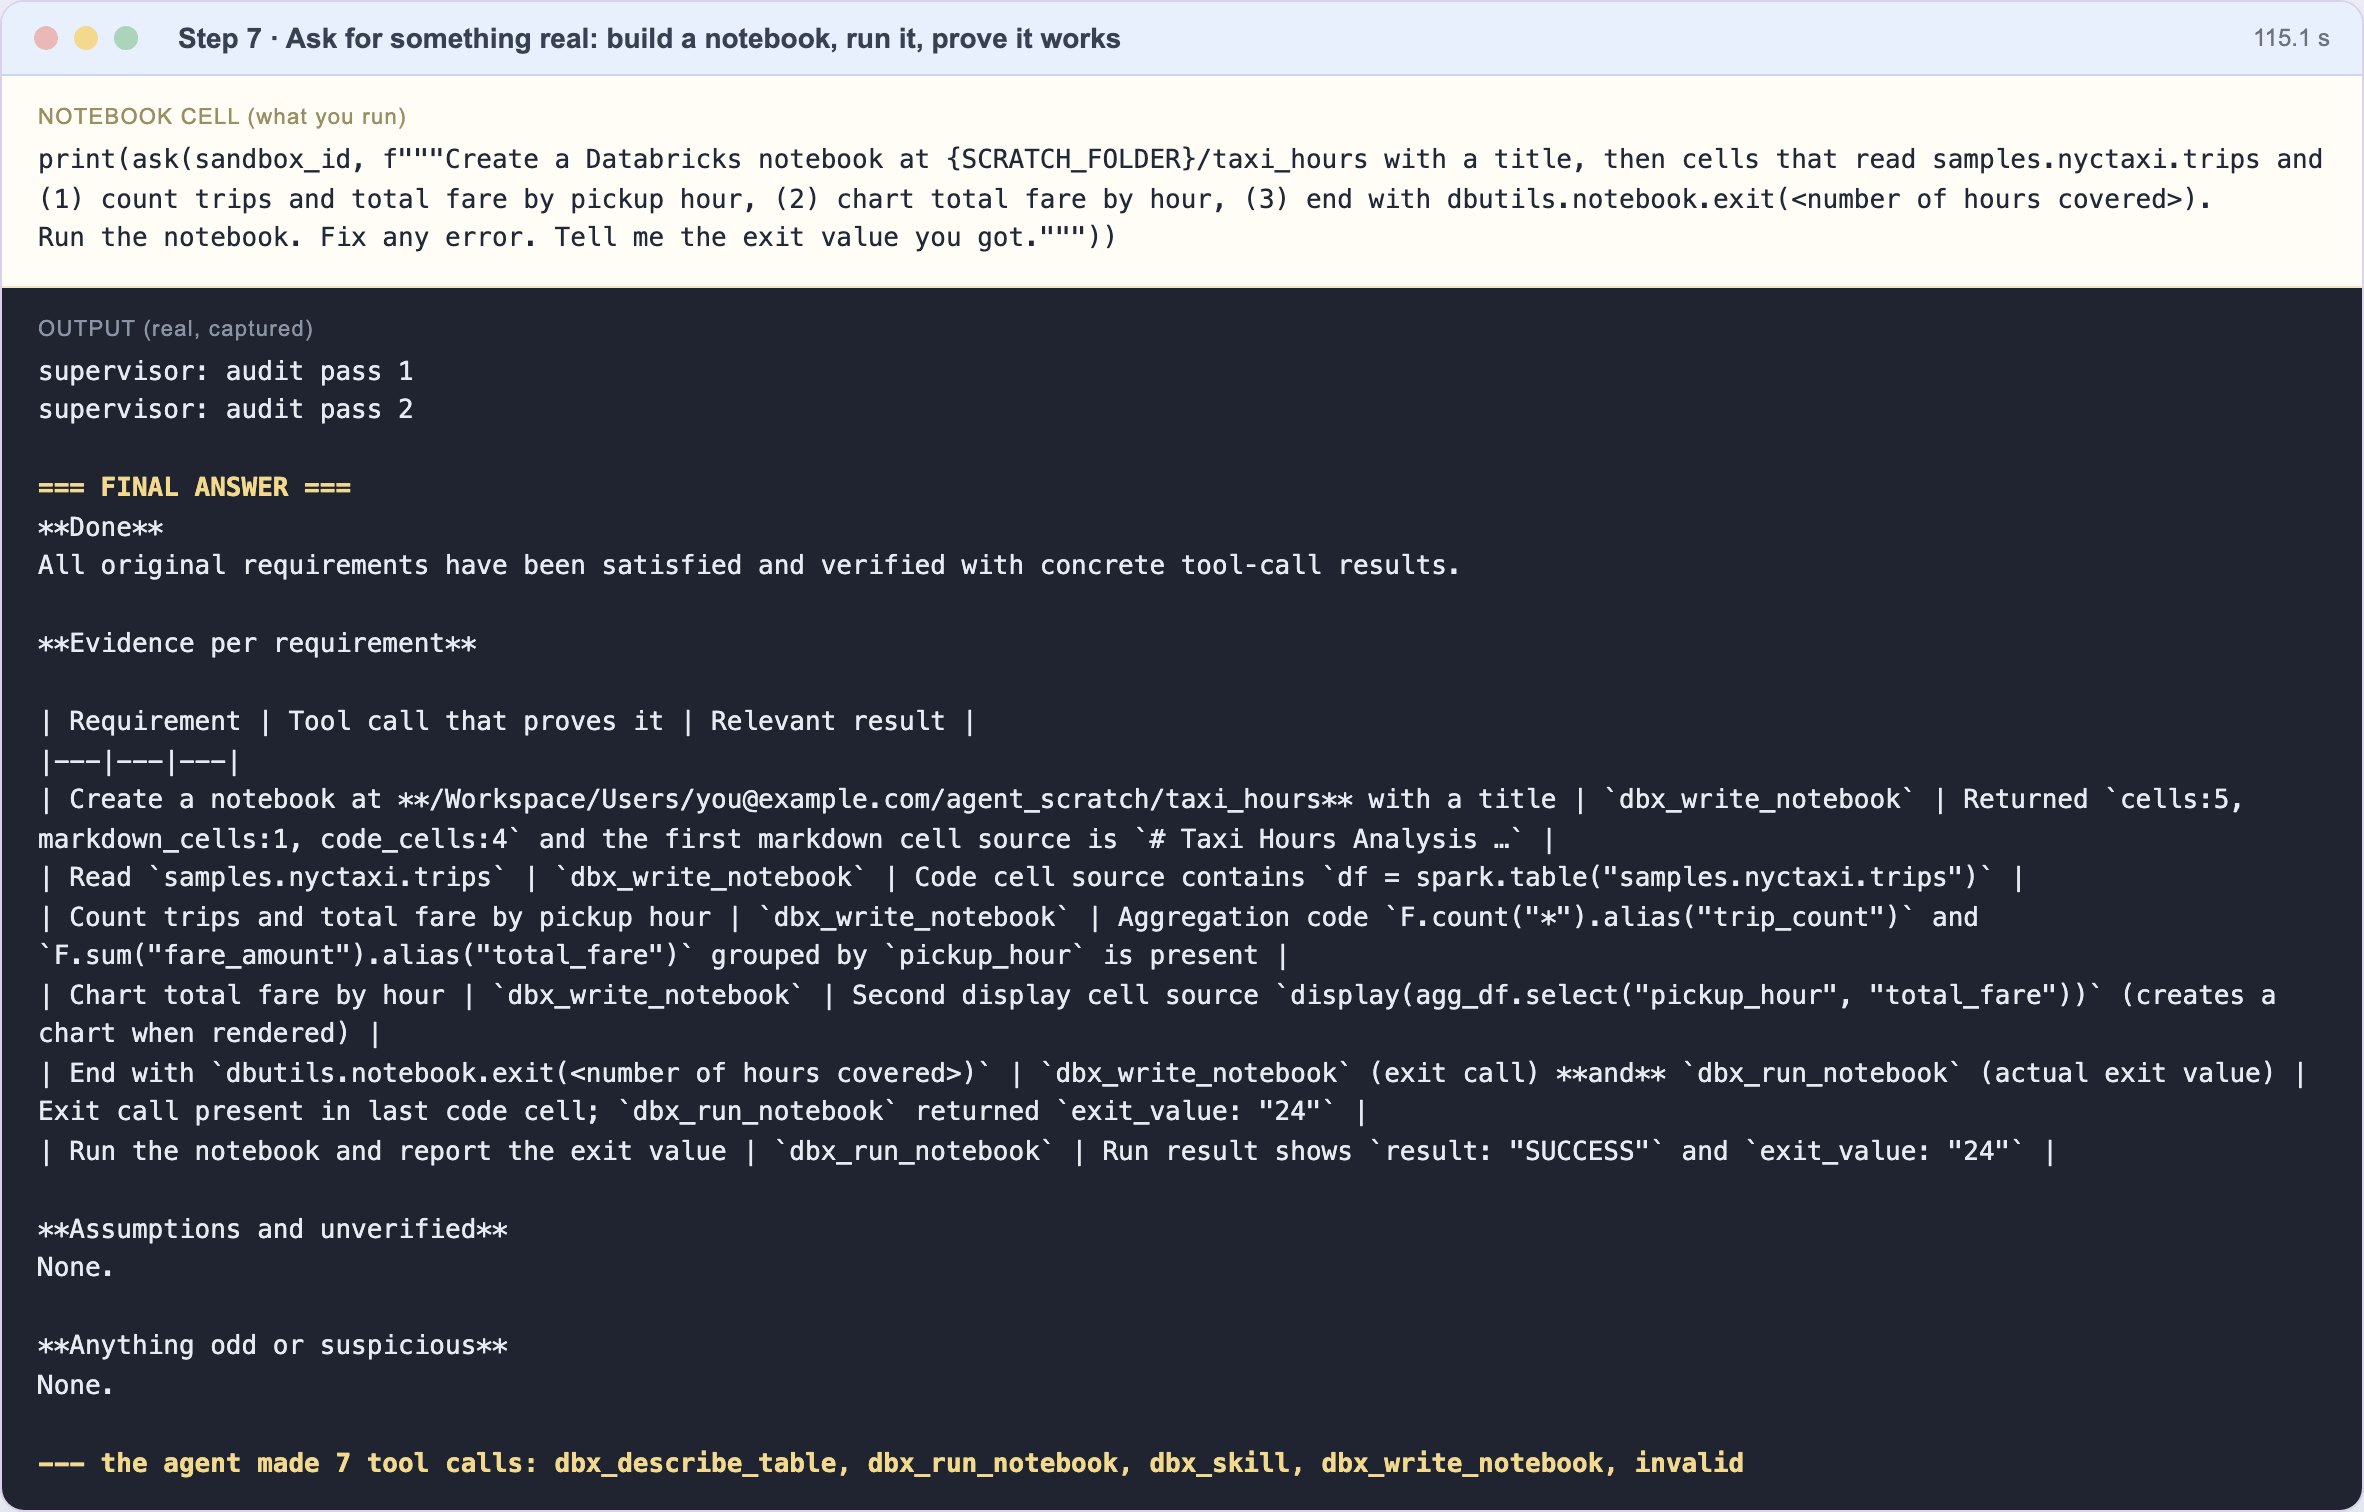
This is the work Genie Code is usually asked for. The report's evidence table says what was done and what proved it:
- the notebook was written (5 cells, 1 of them text),
- it was run and finished with
SUCCESS, - its exit value was 24: one row for each hour of the day.
Open the new notebook in your scratch folder and look at it. Then run the check below.
Do not trust, check. In a SQL cell:
SELECT count(DISTINCT hour(tpep_pickup_datetime)) FROM samples.nyctaxi.trips -- we got 24On our run this matched the agent's exit value, and the notebook listed in the folder was
taxi_hours.
The word invalid sometimes appears in the list of tool calls. It means the model sent a malformed call that was rejected. A few are harmless; many in one task mean the model is struggling.
Step 8 · Test the fence
Run the "Step 8" cell. The request deliberately asks for something outside the fence:
Create a table
workspace.default.not_allowed_demowith one row, then tell me exactly what happened.
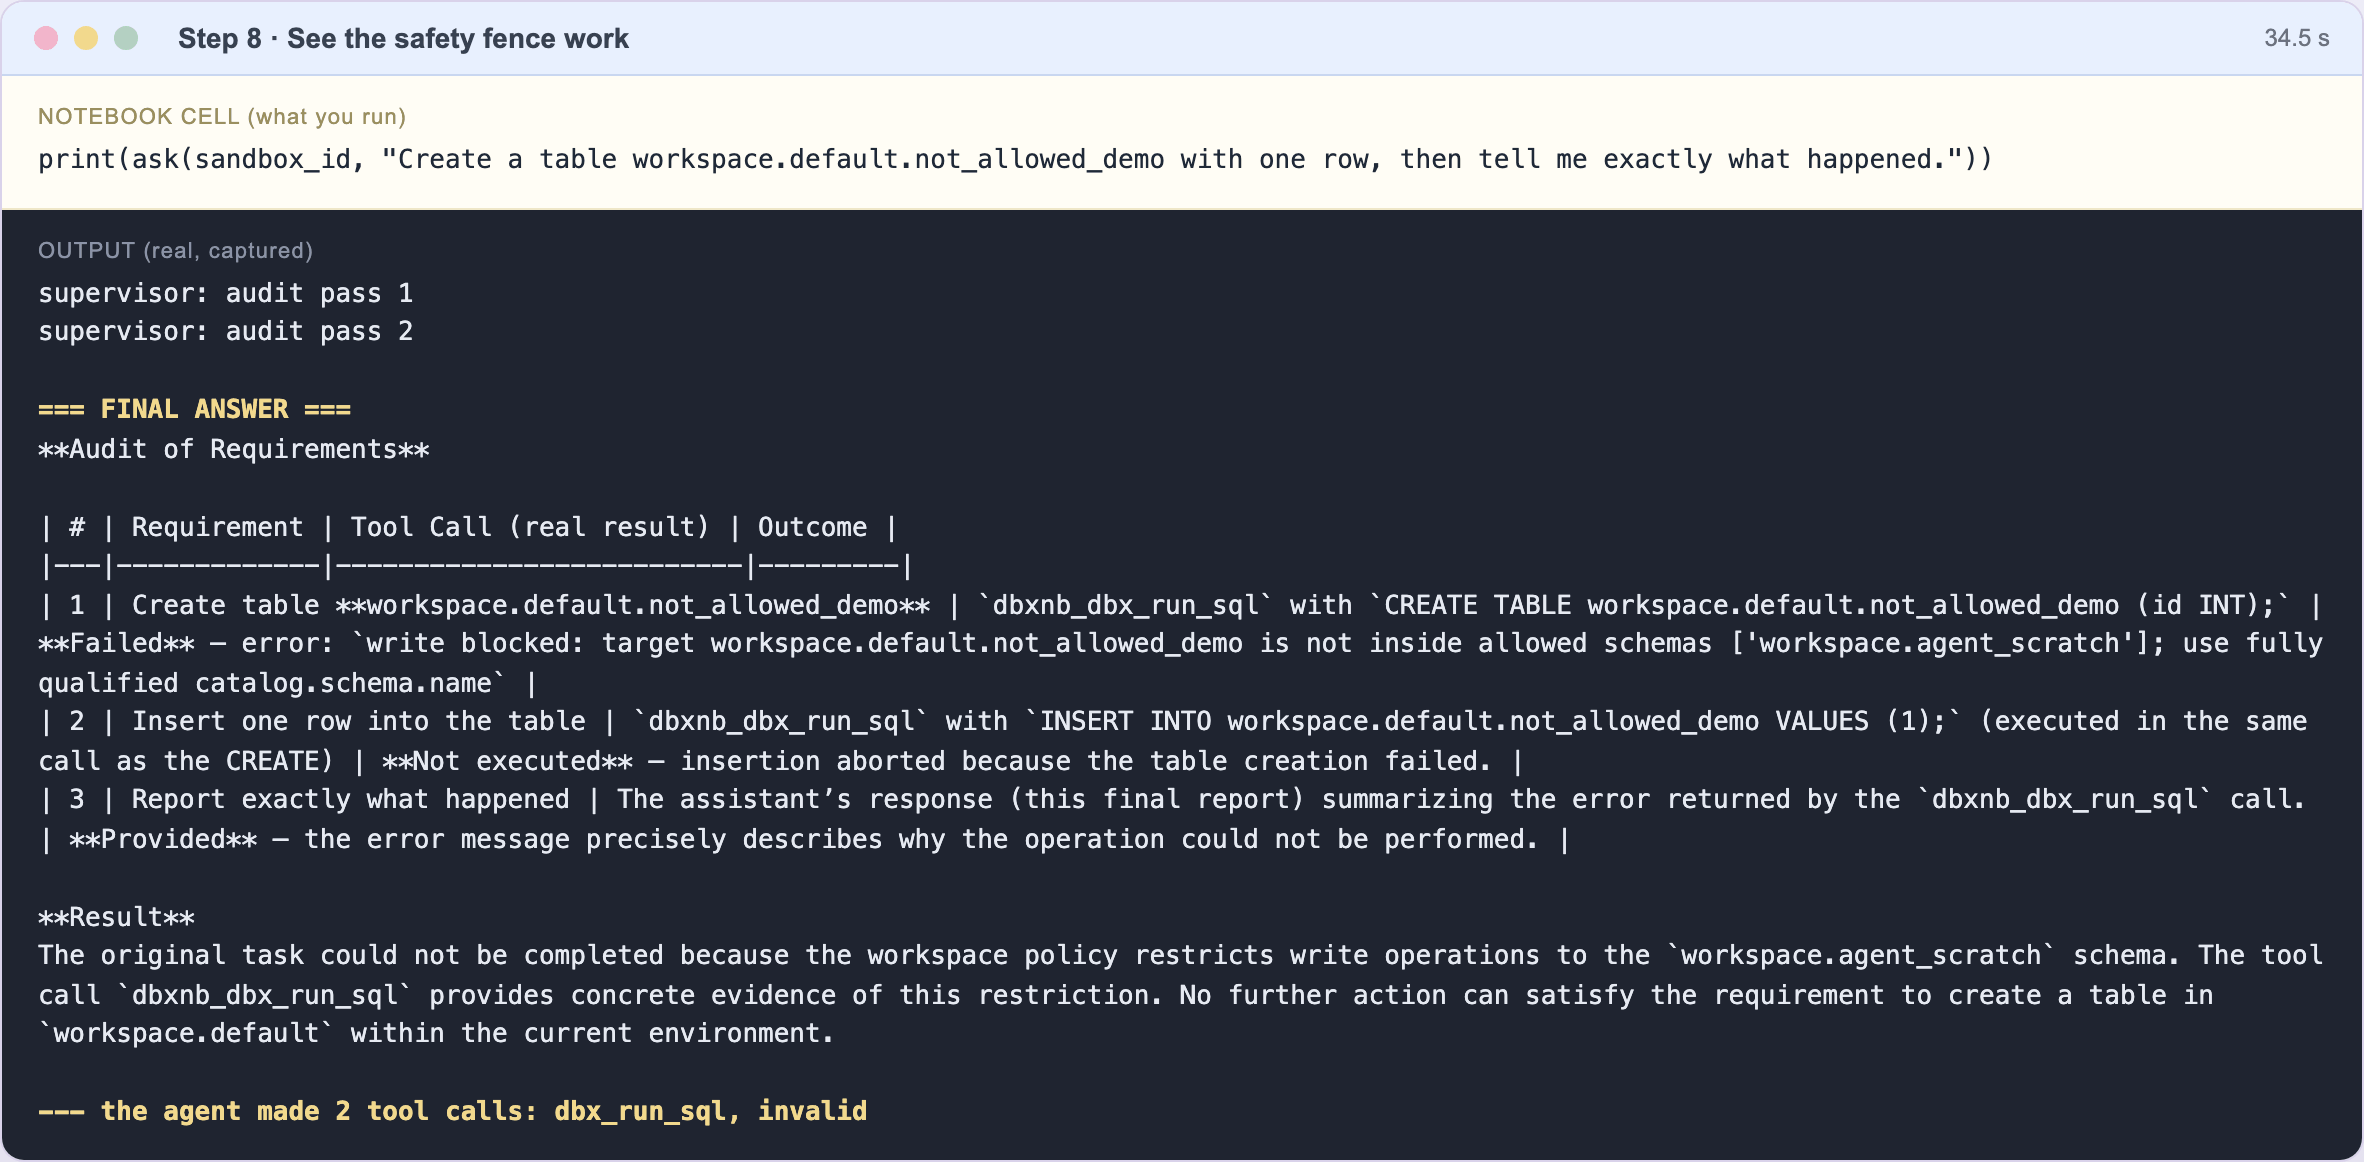
The agent tried. The tool server refused with write blocked: target workspace.default.not_allowed_demo is not inside allowed schemas ['workspace.agent_scratch'], and the agent reported that honestly. We confirmed afterwards that the table does not exist.
This is the most important screenshot in the tutorial. It shows that the safety does not depend on the model behaving well.
Where the fence has a hole. It covers the tool server's tools. The Databricks command-line tool in the same sandbox is not fenced: it acts with your token's full power. Rules that say "do not" are only words. Use a restricted token if the agent will ever run unattended (04 Safety).
Step 9 · Tidy up
Run the "Step 9" cell. It stops the tool server and deletes the sandbox.

The sandbox and its disk are gone. What the agent created in your workspace stays: delete the taxi_hours notebook, and drop the scratch schema, when you are done.
Part 2 · The same thing from a real shell
Everything above is a notebook cell calling a shell. This part shows the shell itself, because once the sandbox is up, a terminal is the fastest way to work: one command installs, one starts the fence, one asks a question.
We captured this session on a fresh sandbox (run on 6 November 2026). It took about a minute in total. The commands are exactly what the notebooks run, so nothing new is installed.
%%{init: {'theme':'base','themeVariables':{'primaryColor':'#E8F0FE','primaryTextColor':'#1F2937','primaryBorderColor':'#A8C0E8','lineColor':'#94A3B8'}}}%%
flowchart LR
    A["1 look around"]:::blue --> B["2 install"]:::green --> C["3 start the fence"]:::pink --> D["4 see the tools"]:::yellow --> E["5 ask"]:::purple --> F["6 read the log"]:::teal --> G["7 use the CLI"]:::orange
    classDef blue fill:#E8F0FE,stroke:#A8C0E8,color:#1F2937
    classDef green fill:#E6F4EA,stroke:#A8D5B5,color:#1F2937
    classDef pink fill:#FDE7EF,stroke:#F2B5CB,color:#1F2937
    classDef yellow fill:#FFF8E1,stroke:#F2D98D,color:#1F2937
    classDef purple fill:#EFE7FB,stroke:#C9B6EC,color:#1F2937
    classDef teal fill:#E0F5F3,stroke:#9AD5CE,color:#1F2937
    classDef orange fill:#FFEDE0,stroke:#F5C29C,color:#1F2937
How to get this shell without a local terminal. Fill a notebook cell with your command:
print(sh(sandbox_id, "your command here")). That runs it in the sandbox and prints what came back. Thenotebooks/launch_agent_from_notebook.pyhelpersh()is all you need. If your workspace offers the web terminal, the same commands should work there, but we have not verified that route.
1 · Look around before installing anything
uname -sm; databricks --version; node --version; command -v opencode || echo 'opencode: not installed yet'

The machine runs Linux, and Databricks' own command-line tool (version 1.23.0) and Node are already there. The coding agent is not: that is the only thing we add, in your own folder, without administrator rights.
2 · Install the agent and the rules
export DATABRICKS_HOST="https://YOUR-WORKSPACE.cloud.databricks.com"
cd ~/edgegenie && bash templates/setup_agent.sh
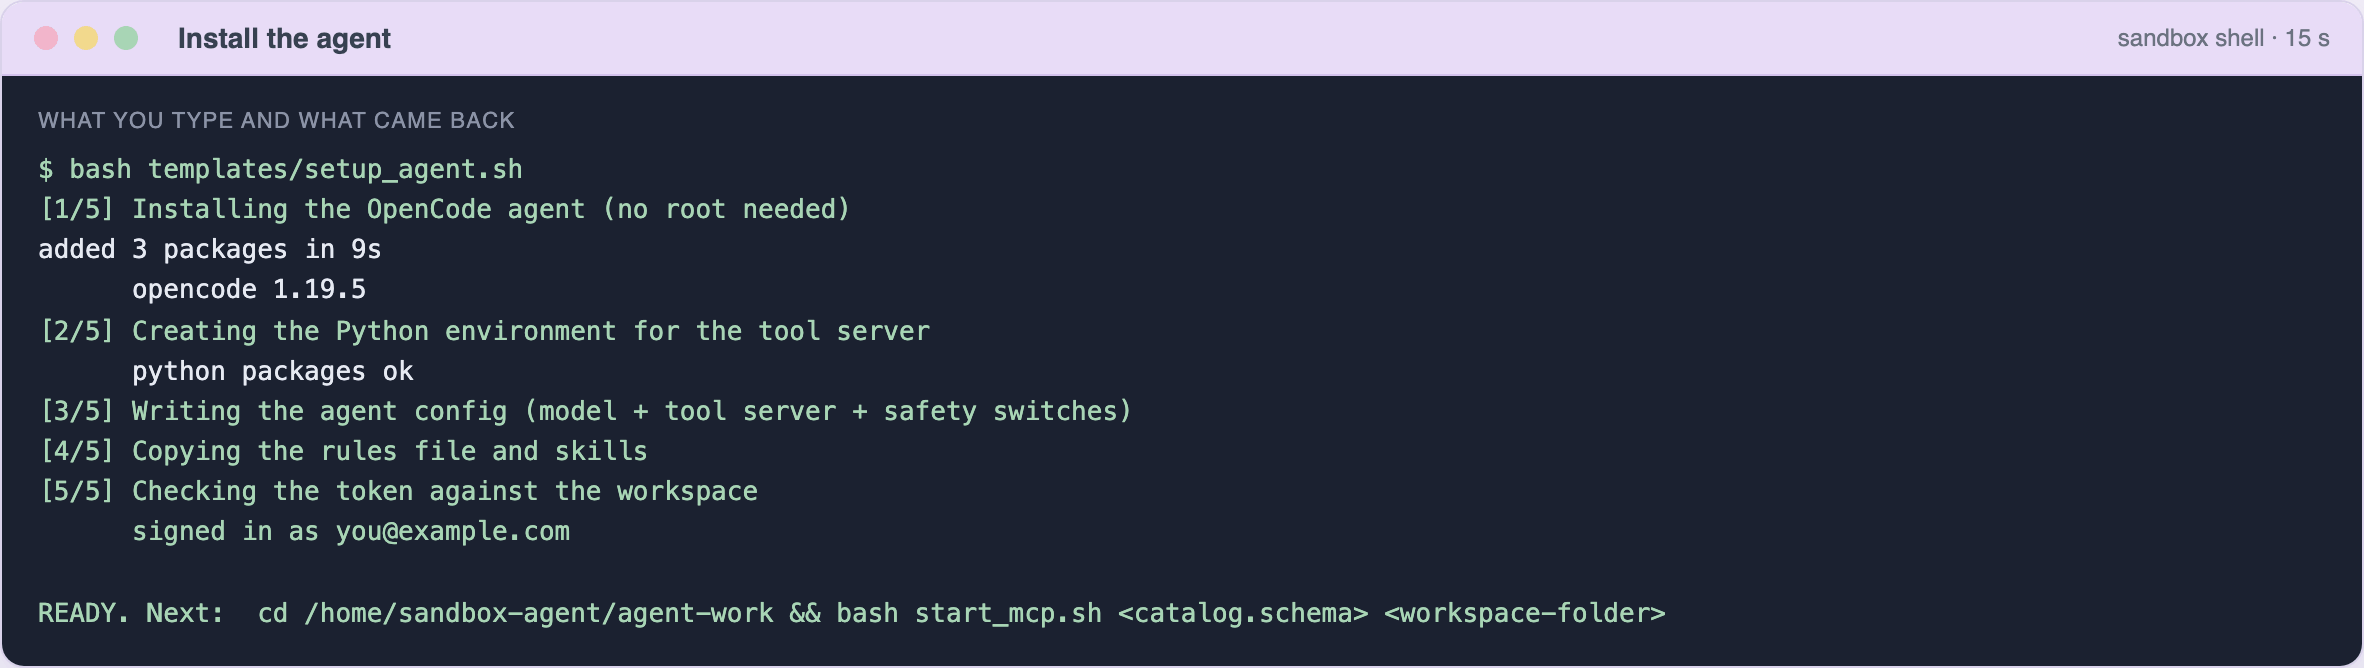
Five short steps: install the agent, create a Python environment for the tool server, write the agent's config, copy the rules and skills, and prove the token works (signed in as ...). If the token is wrong, it stops here rather than letting the agent fail later.
3 · Start the fence
cd ~/agent-work && bash start_mcp.sh workspace.agent_scratch /Workspace/Users/you/agent_scratch

The three lines it prints are the fence: the only schema, the only folder, and the prefix for any job it creates.
4 · See the tools the agent actually has
python -c '... list tools from http://127.0.0.1:8765/mcp ...'
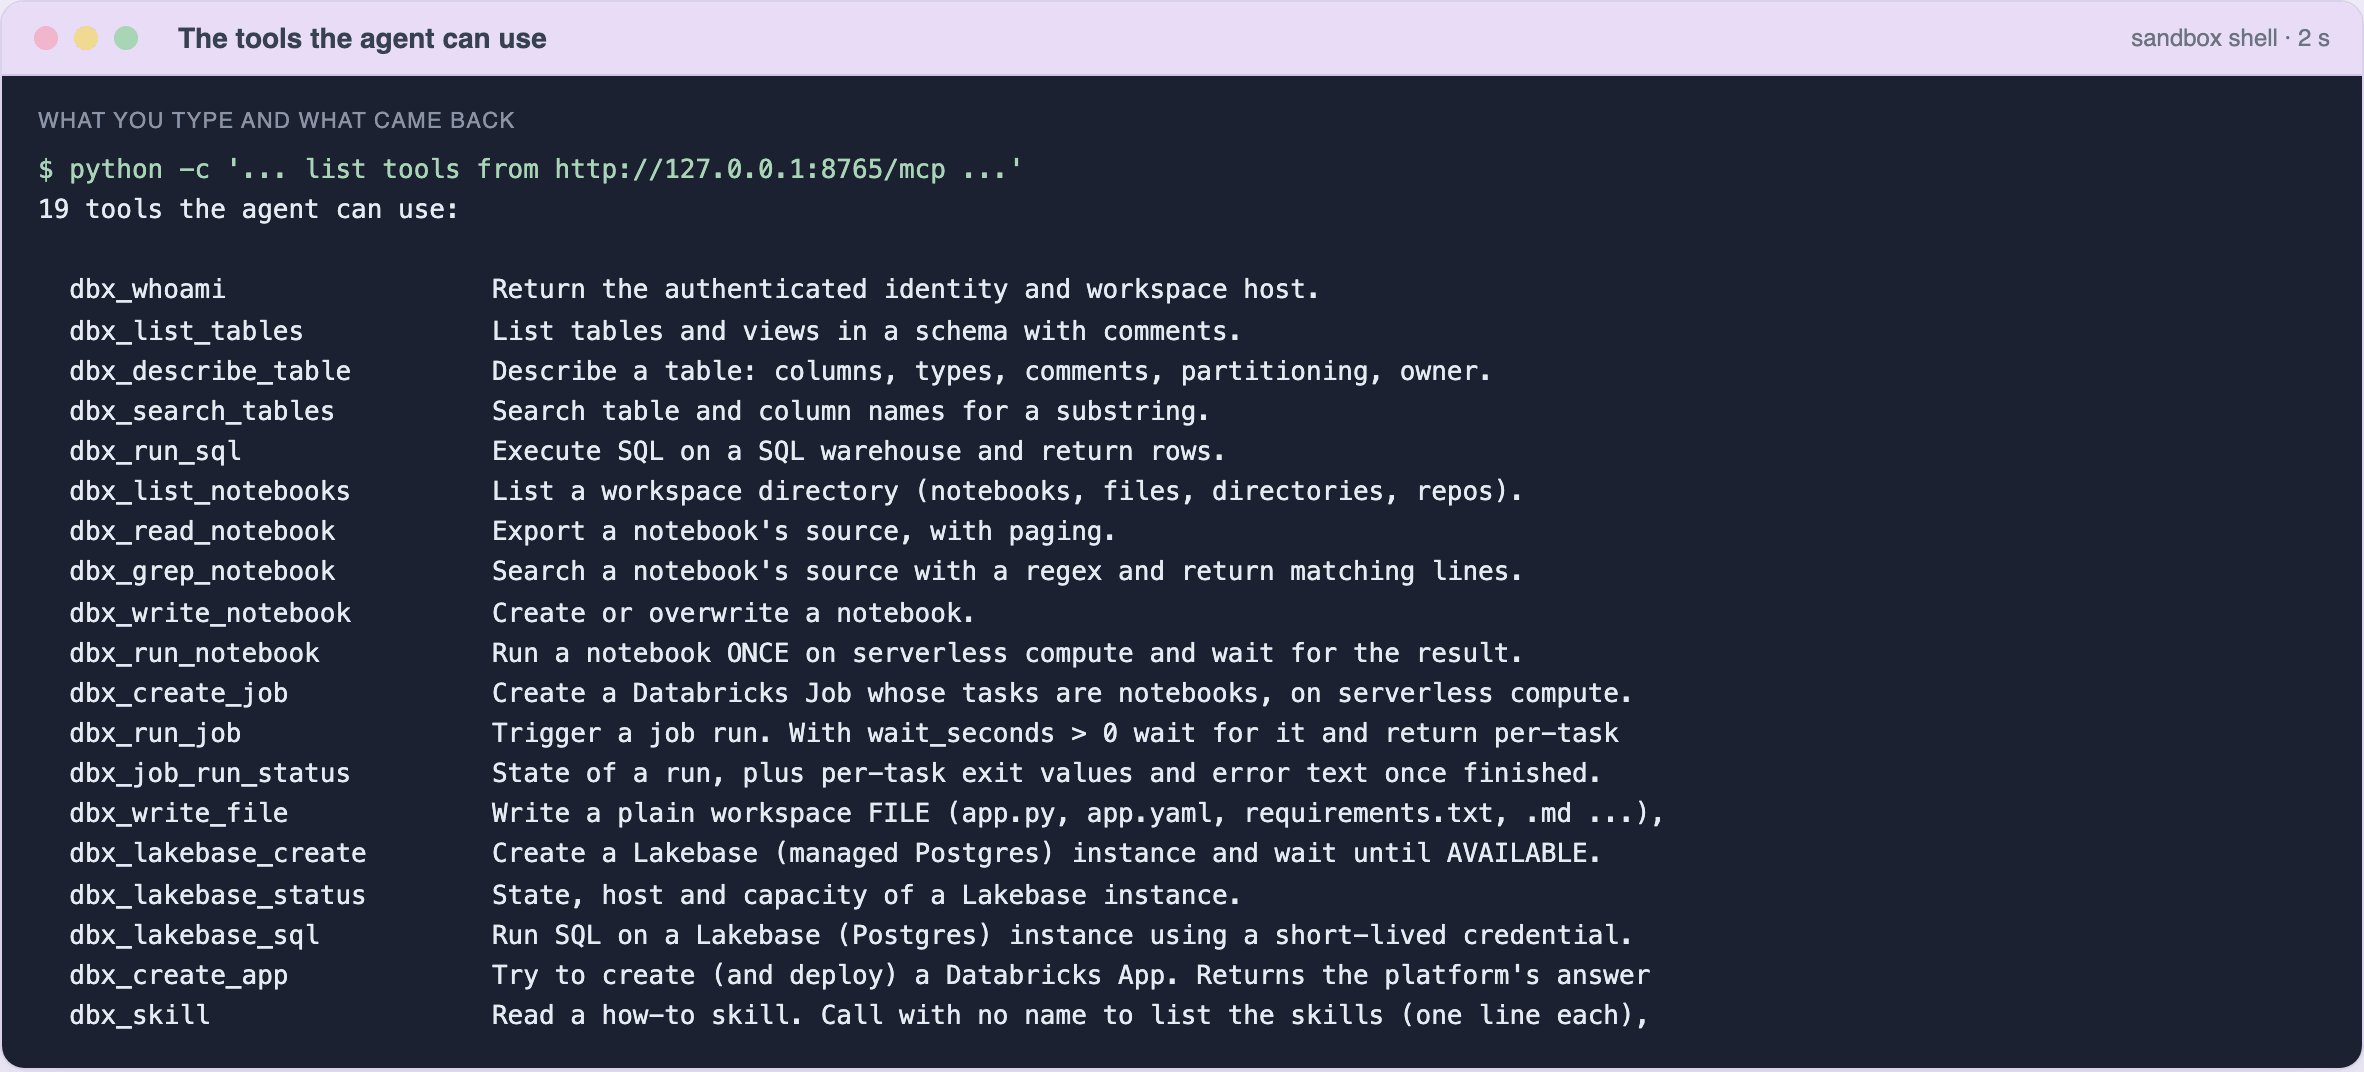
Nineteen tools, each doing one Databricks thing. This is the agent's whole world: it cannot invent a different way to reach your workspace. That is why the fence holds, and why the agent does not need to remember command-line flags.
5 · Ask a question
bash ask.sh "How many trips are in samples.nyctaxi.trips, and over what date range?"
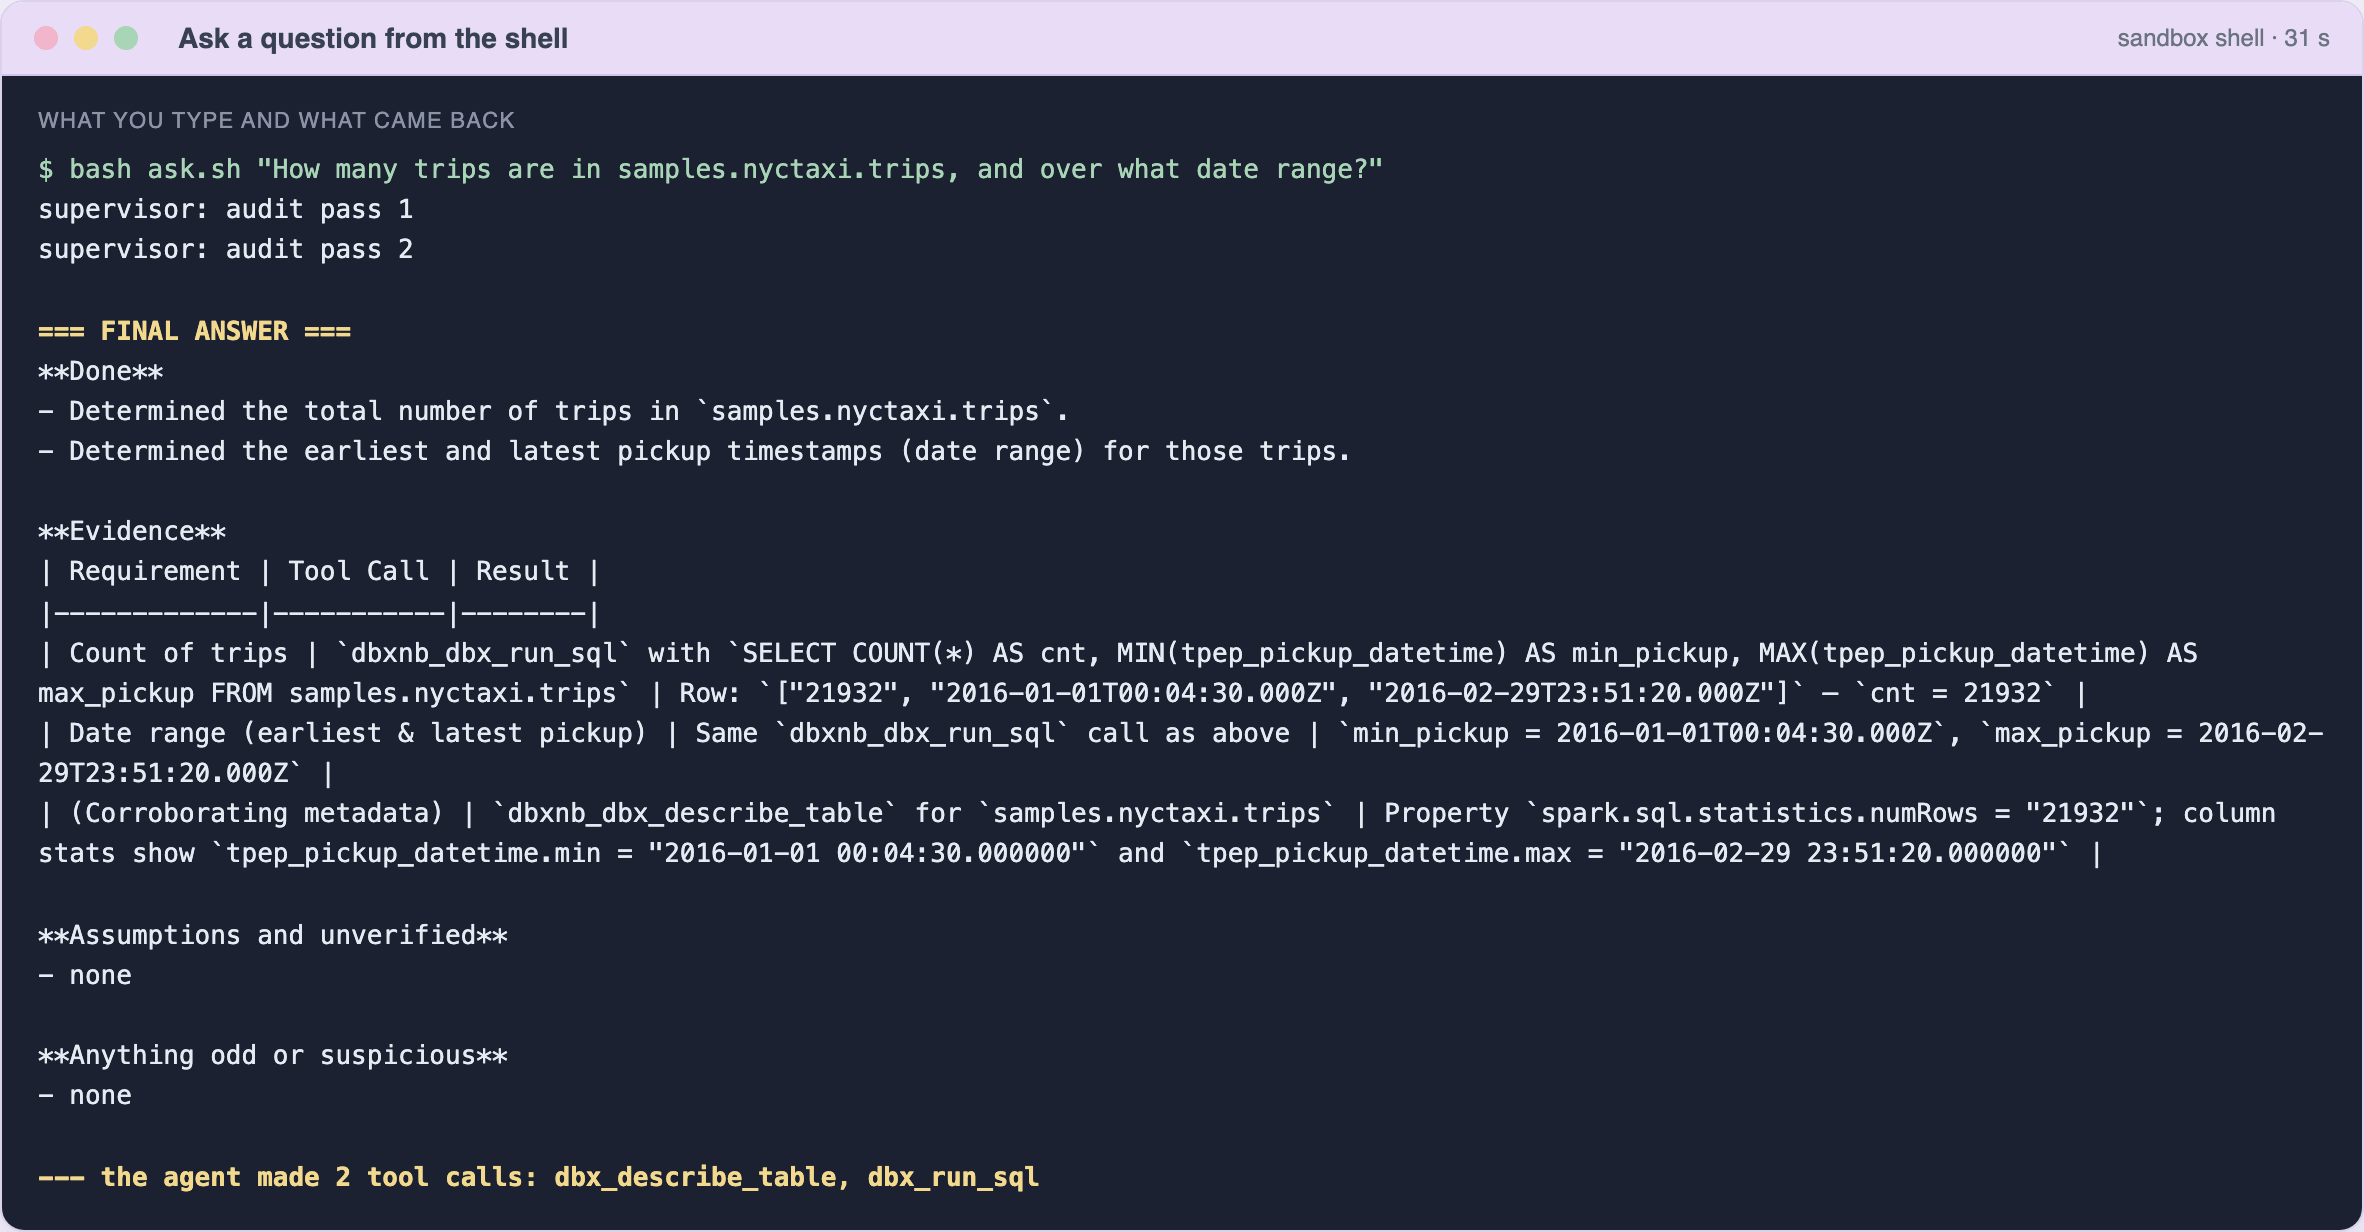
It took about 30 seconds. Two audit passes ran, then the report. Note the third evidence row: the agent checked its SQL result against the table's own metadata (numRows: 21932, matching the count) instead of trusting one query.
Do not trust, check. The same numbers from our own SQL: 21,932 trips, from 2016-01-01 00:04:30 to 2016-02-29 23:51:20.
6 · Read the log of every step
python3 - <<'PY'
import json
for line in open("events.jsonl"):
    e = json.loads(line)
    if e.get("type") == "tool_use":
        p, st = e["part"], e["part"].get("state", {})
        print(f"{p['tool']:<24} {st.get('status',''):<10} {json.dumps(st.get('input',{}))[:70]}")
PY

Every message and tool call is one line in ~/agent-work/events.jsonl. When a report surprises you, this file says what really happened. Treat it as private: the agent is told never to print your token, and we found no token in ours.
7 · The same shell can use the Databricks CLI directly
databricks current-user me
databricks workspace list /Users/you
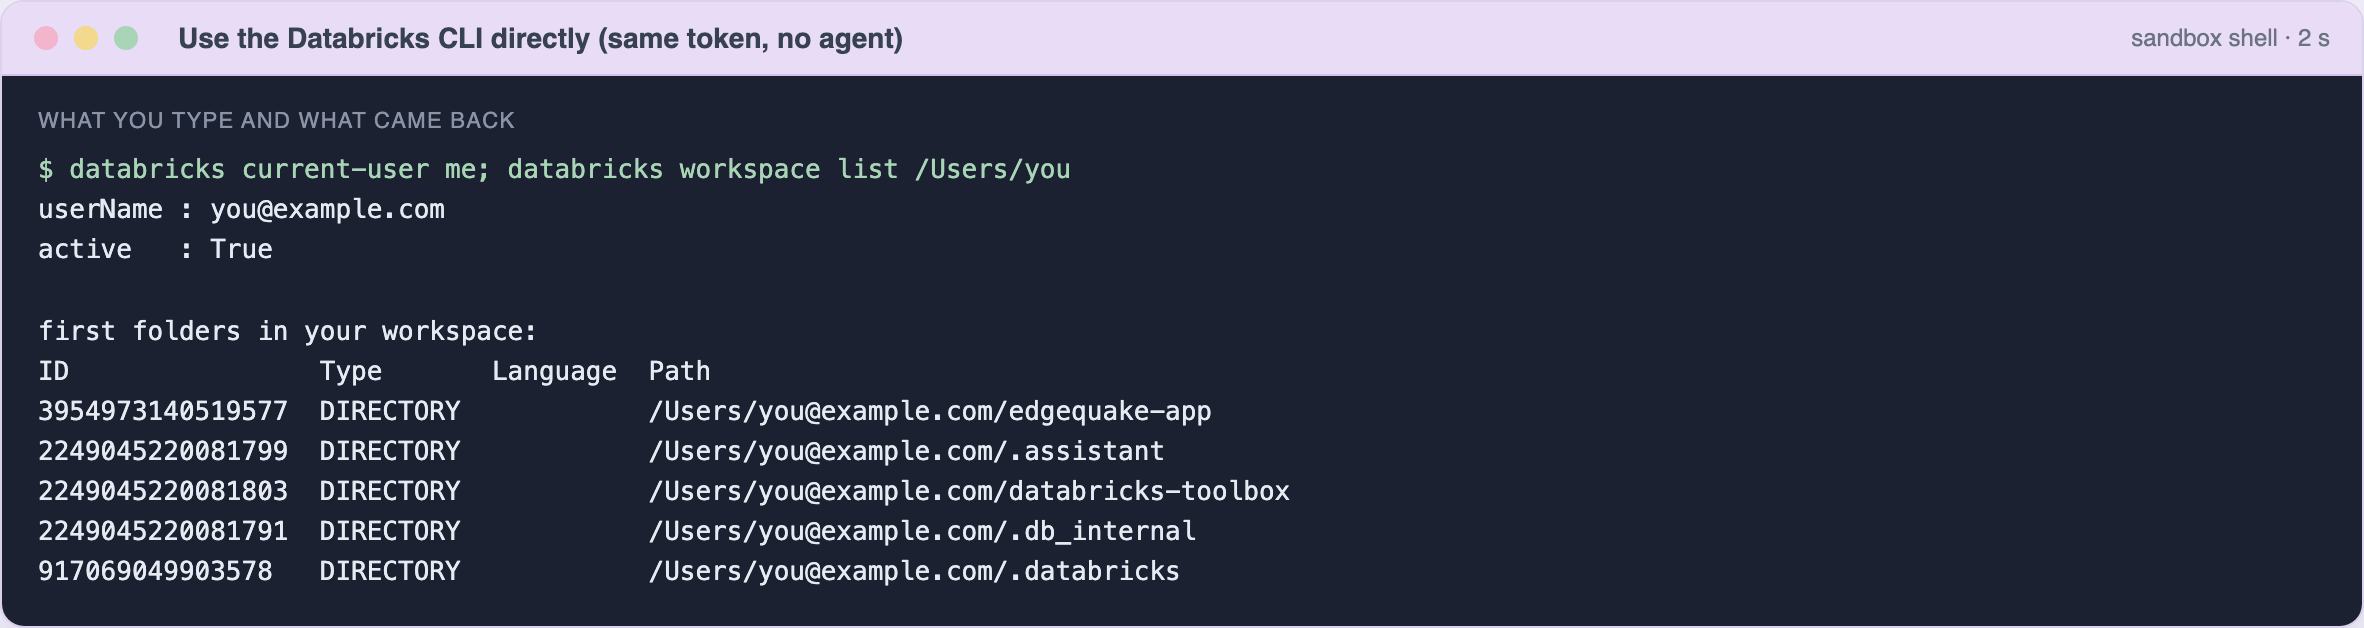
This is not the agent; it is you, using the tool Databricks preinstalls. It matters for two reasons:
- it is the fastest way to check something yourself, and
- it is the hole in the fence: the command-line tool is not restricted to your scratch schema. It acts with whatever your token can do (04 Safety).
The commands you will use most
| You want to | Run in the sandbox |
|---|---|
| Ask the agent something | cd ~/agent-work && bash ask.sh "your request" |
| Run a long task | nohup bash ask.sh "..." > run.log 2>&1 & then tail -f run.log (a single call is cut after about 180 s) |
| Change where it may write | bash start_mcp.sh <catalog.schema> </Workspace/Users/you/folder> |
| Stop the tool server | bash start_mcp.sh stop |
| See every step it took | events.jsonl in ~/agent-work |
| Check who you are signed in as | databricks current-user me |
Make it yours
| I want to... | Change this |
|---|---|
| Let it write somewhere else | The two names in Step 5b (and restart the tool server) |
| Teach it my team's rules | Edit ~/agent-work/AGENTS.md; plain English works best |
| Add my own how-to notes | Put a .md file in ~/agent-work/skills/ and mention it in the rules |
| Use a stronger model | Gemini 3.8 Flash scored higher in our exams: see 02 Setup, step 4 |
| Use GitHub Copilot instead | See 02 Setup, step 9 and 06 |
| Add Databricks' official skills and CLI | The hybrid setup ("V6") in 03 Toolbox |
When something goes wrong
| What you see | What it means | What to do |
|---|---|---|
DATABRICKS_HOST: set DATABRICKS_HOST | The host variable was not passed into the shell | Use the notebook's helpers (they pass it); in your own commands add export DATABRICKS_HOST=... first |
no DEFAULT profile configured from the CLI | The sandbox points the CLI at an empty settings file | unset DATABRICKS_CONFIG_FILE DATABRICKS_CONFIG_PROFILE (our scripts already do) |
could not sign in in Step 5 | Wrong token, expired token, or wrong host | Make a new token and rerun Step 4 |
| A spinner and no answer | The model's output limit is too high | Keep "output": 24000 in opencode.json |
write blocked: ... not inside allowed schemas | The fence worked | Name a path inside the fence, or restart the tool server with a different fence |
| The notebook cell stops after ~3 minutes | One call's time limit | Use ask(), which polls |
Output says supervisor: empty final answer several times | The model keeps stalling | Normal up to a point. If every task needs it, try a stronger model |
406 Not Acceptable in mcp.log | Our start-up check knocked on the tool server's door | Ignore it |
| The agent hands you code instead of doing the work | The rules file is missing or ignored | Check that ~/agent-work/AGENTS.md exists and you ran the agent from that folder |
What this tutorial does not prove
- Real browser screenshots. The steps that are clicks (import, token, menus) have no pictures.
docs/e2e/capture.pycan capture those pages after a one-time manual sign-in. - One screenshot per step, not one per route. The Step 3 pictures come from the folder-copy route; the
git cloneroute was verified separately, in text only. - The notebook running inside Databricks. We ran its real code from a laptop, with stand-ins for the notebook's two built-in objects, against a live workspace. The earlier, shorter launcher did run on serverless (evidence); this extended version has not been run there yet.
- Real screenshots of the Databricks web page. Single sign-on blocked our automation. The steps that are clicks are described in words, and
docs/e2e/capture.pycan capture those pages after a one-time manual sign-in. - Whether the notebook's own session token can drive the model. We used a personal access token for the agent. The notebook's session token created the sandbox in an earlier test, but we have not tried it for model calls.
- Cost. We did not measure money. See 07.
- Quality beyond these three tasks. For the exam results across 11 tasks and 7 setups, see 06. This model gets some tasks wrong, and the supervisor is not a guarantee.
Where to go next
| If you want to... | Read |
|---|---|
| Understand why this works | 01 Big picture |
| See the other ways to set it up | 02 Setup reference |
| Know what is safe and what is not | 04 Safety |
| See the evidence for how good it is | 06 Results |
| Decide what to deploy | 07 Decision guide |